Clusters
This article refers to Platform v3.3.0. The current Platform version is v3.4.0.
Overview
A Docker Swarm cluster is a group of Edge Nodes that work as a single coordinated system to schedule and run containerized workloads. In Barbara, Swarm is the backbone of High Availability: clusters give you fault tolerance, scalable orchestration, and consistent configuration across nodes. The Clusters view in Barbara Panel is where you create, list, and monitor them.
Cluster creation asks for real addresses from your own network, so before you start it helps to know which network each field belongs to. See Cluster networking for the distinction between the nodes' physical network and the Swarm overlay.
Clusters view
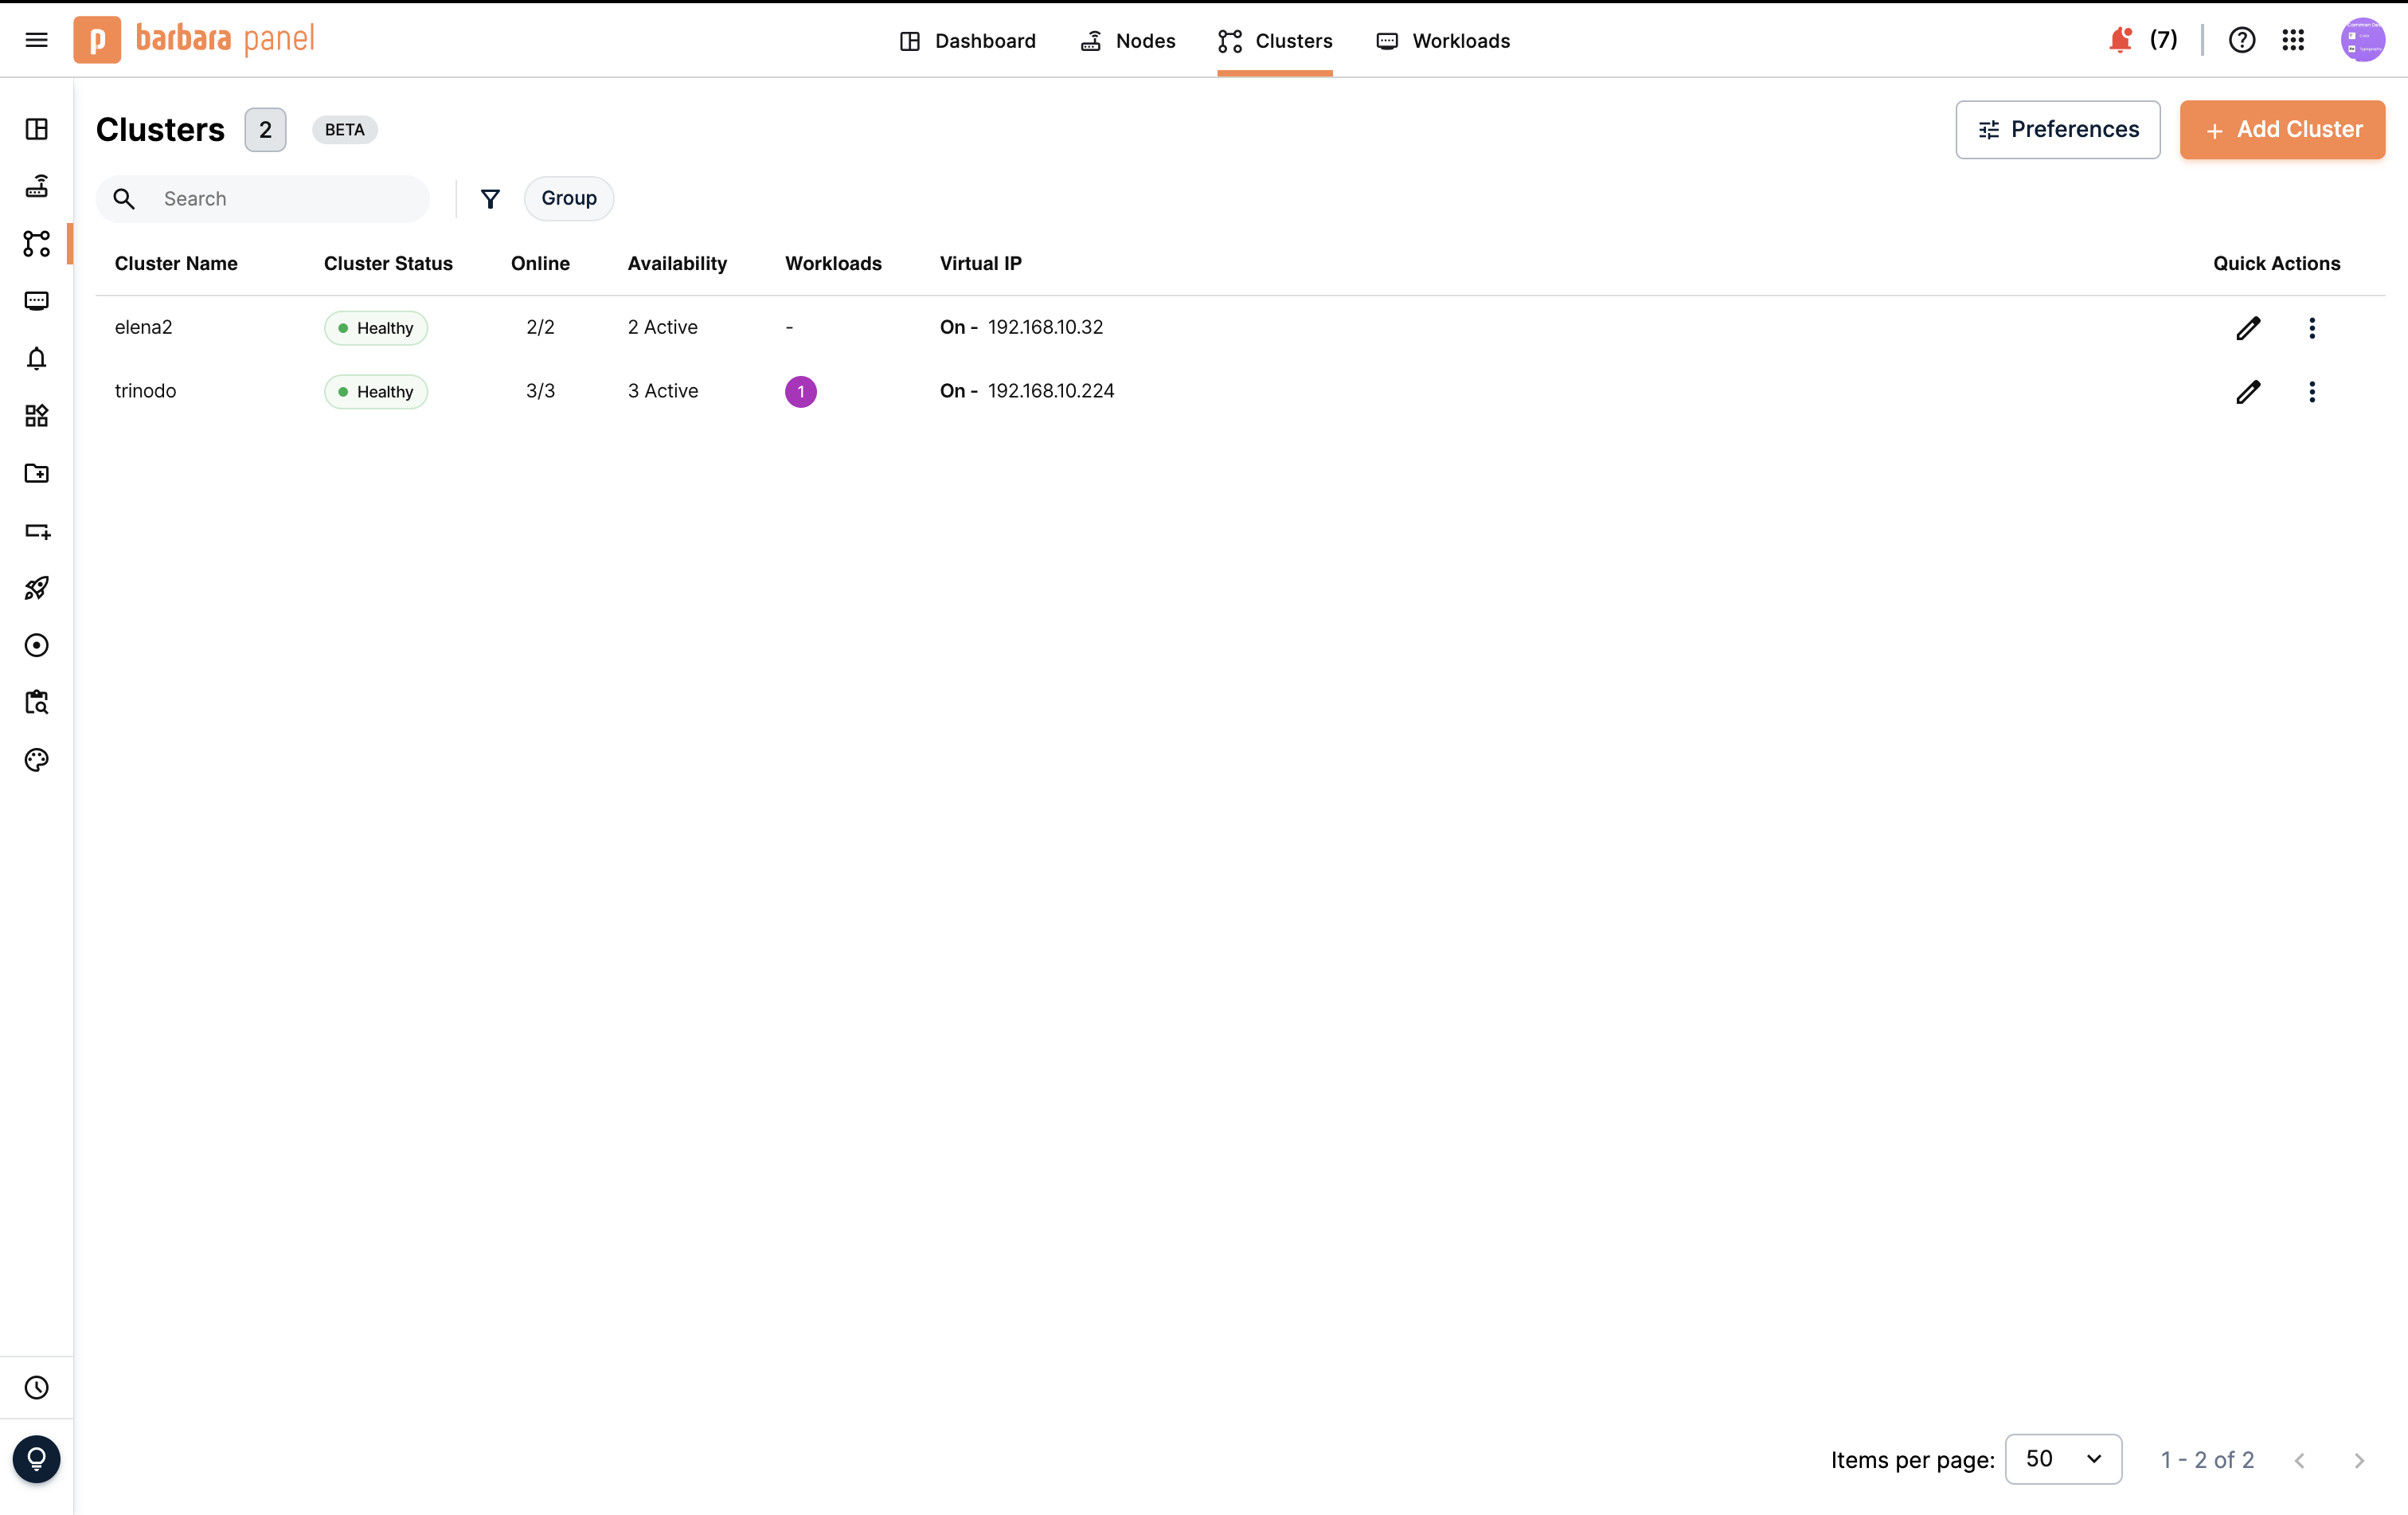
Clusters view
For every cluster the list shows:
- Cluster Name — the name you assigned to the cluster.
- Cluster Status — node availability, evaluated as a proportion of the cluster's nodes. Fewer than half online gives At risk; otherwise at least half active gives Healthy, at least half drained gives At risk, and at least half paused gives Degraded.
- Online — how many of the cluster's nodes are currently online.
- Availability — how many nodes are active and available.
- Workloads — the number of applications and models deployed on the cluster.
- Virtual IP — whether the feature is on, followed by the assigned address.
Each row offers two quick actions: an edit action that reopens the cluster in the Edit cluster popup, and a menu with the remaining per-cluster operations.
At the top of the page, Search filters clusters by name, Group organizes the list by node group, Preferences picks which columns are visible, and + Add Cluster opens the wizard.
Cluster Status measures node availability, not whether your applications are running. At risk means the cluster has lost redundancy: the workloads already running usually keep running, but Swarm can no longer reschedule or recover them until enough nodes come back.
Clusters are marked BETA in Barbara Panel, so expect the interface to keep evolving.
Add Cluster wizard
The wizard has two steps, Cluster definition and Node details, and the fields it shows depend on whether you enable the virtual IP.
Step 1 — Cluster definition
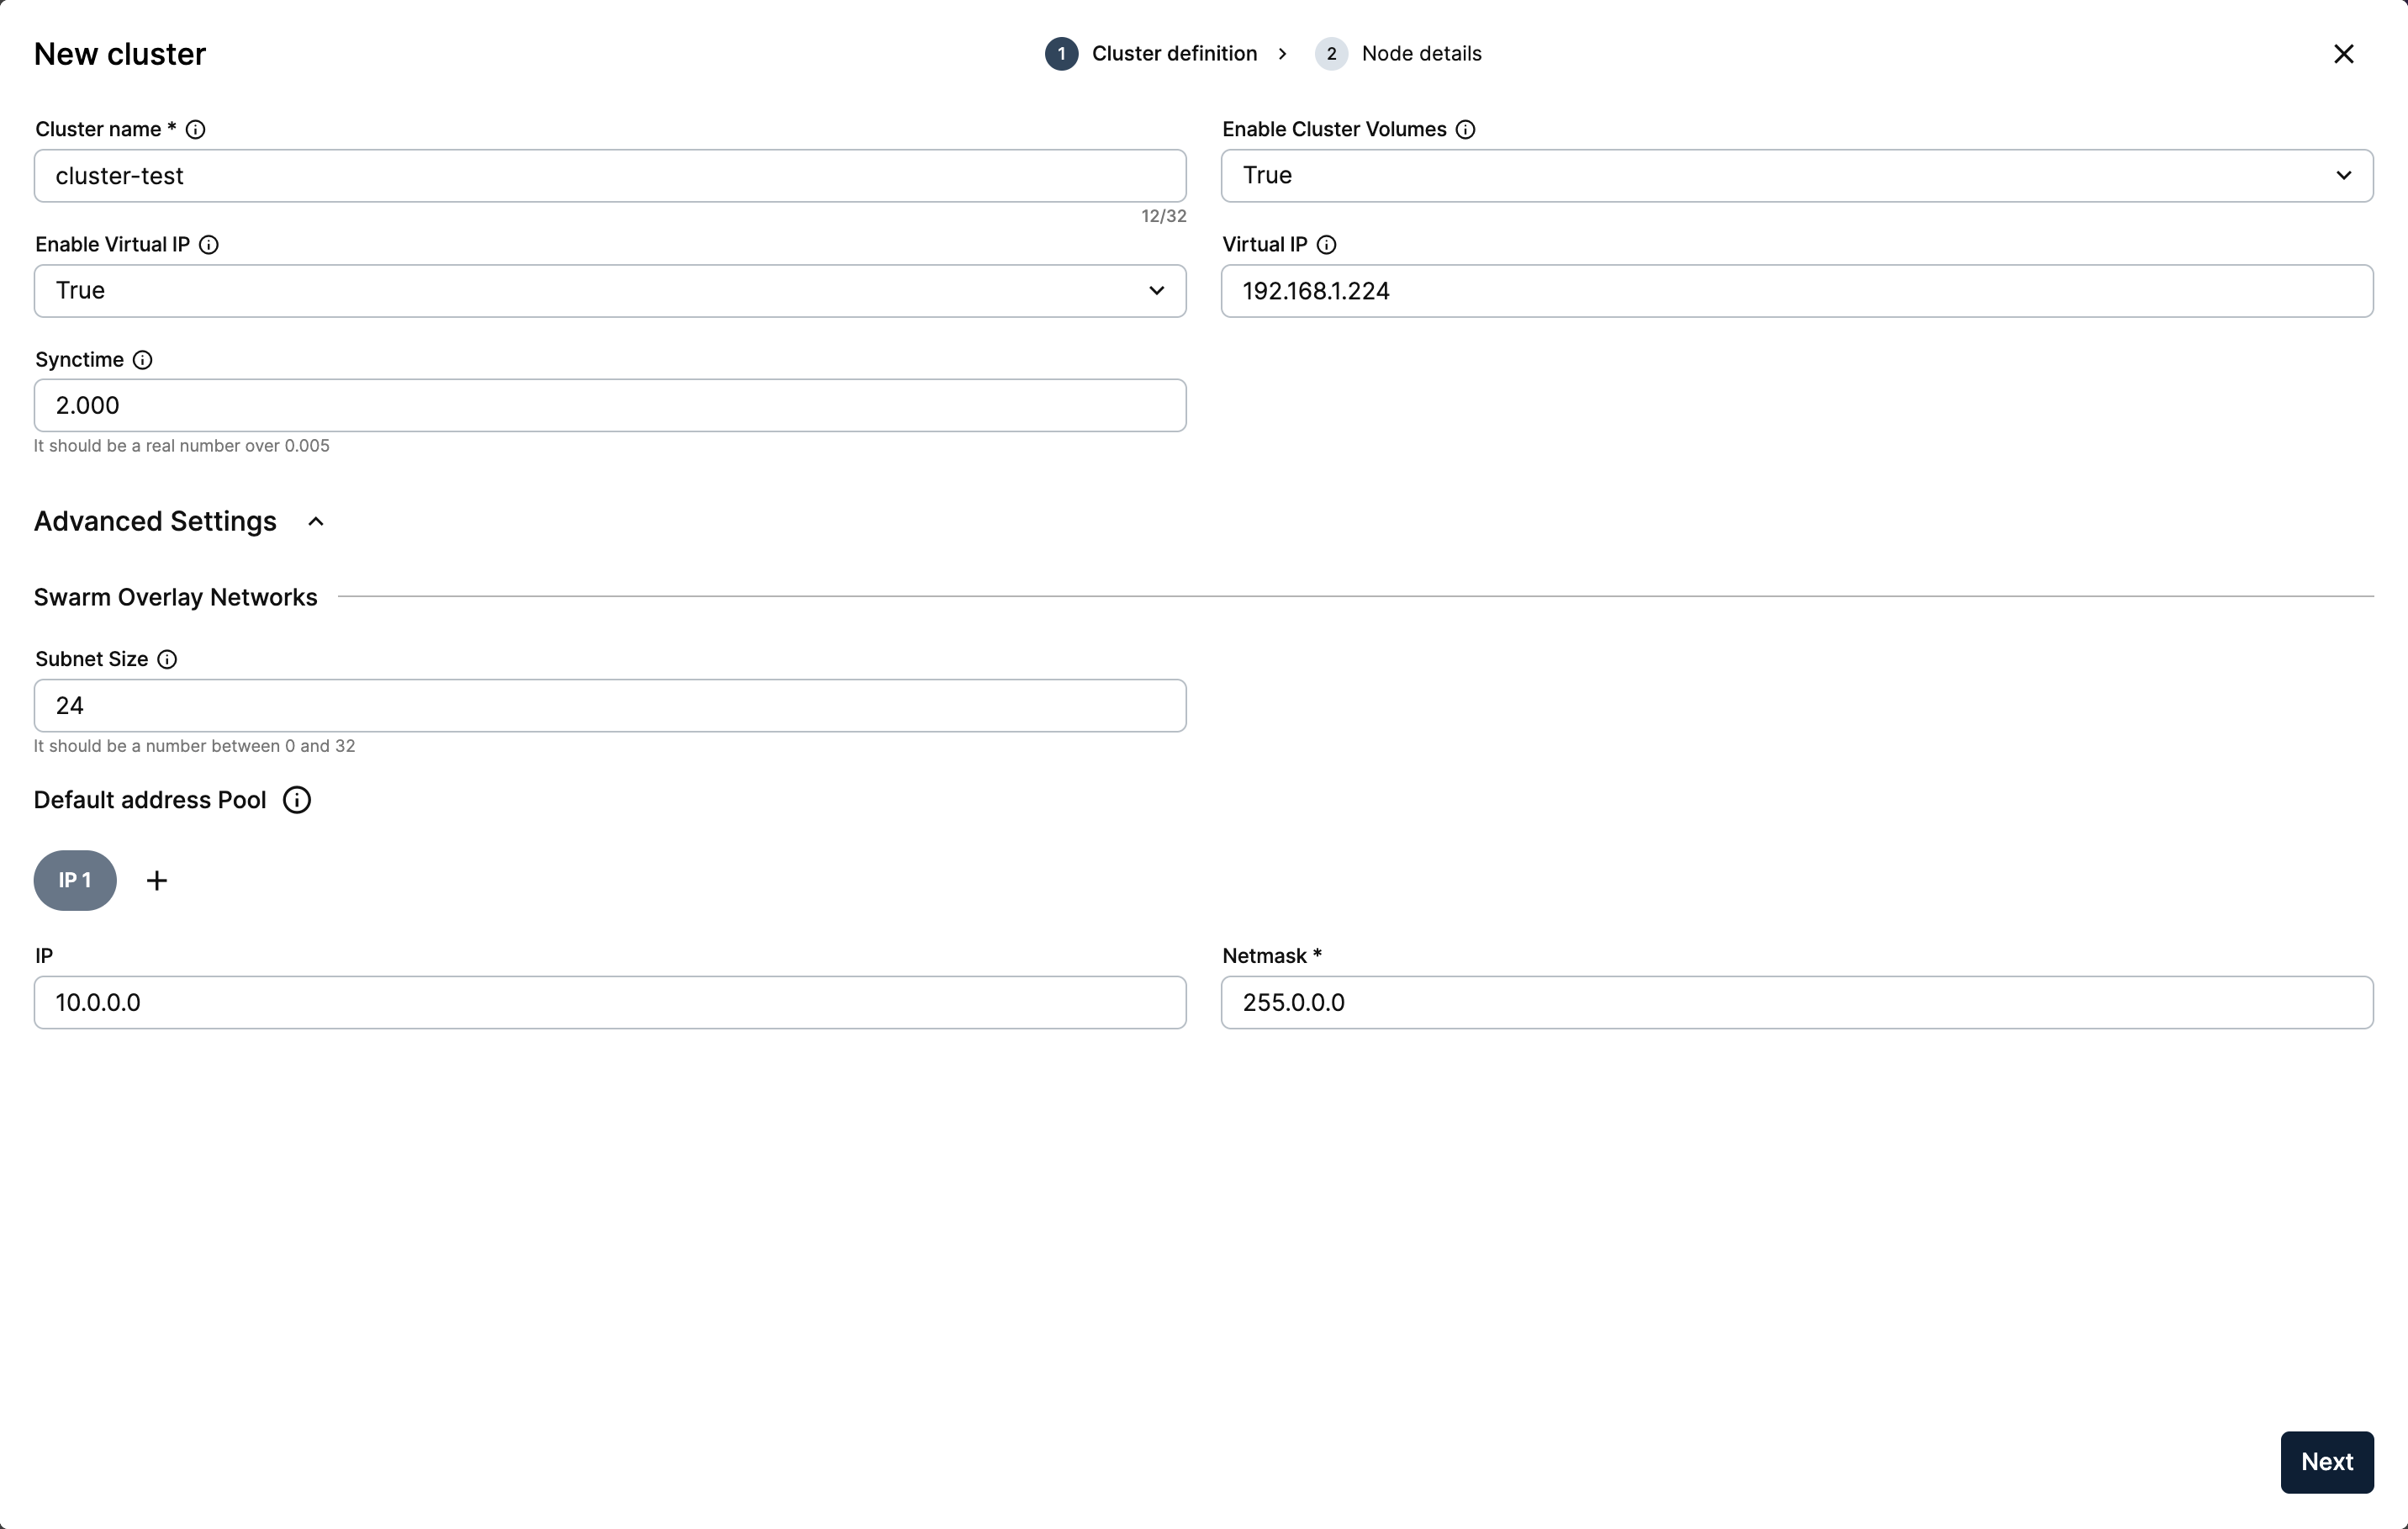
Cluster definition
Define the cluster itself:
- Cluster name — up to 32 characters.
- Enable Cluster Volumes — set to True to give the cluster shared volumes, replicated across nodes by GlusterFS. Default True. Decide this now: a cluster created with this set to False cannot create shared volumes afterwards.
- Enable Virtual IP — set to True to assign the cluster a single entry address that KeepAlived moves to another node automatically if the current one fails. Default False.
Under Advanced Settings → Swarm Overlay Networks you configure the internal network that application containers use. Subnet Size is a number between 0 and 32, default 24, and Default address Pool takes an IP and a Netmask, default 10.0.0.0 and 255.0.0.0. Use + to add further ranges. Keep these values unchanged unless the default range overlaps a network you already use.
When you enable the virtual IP
Setting Enable Virtual IP to True reveals two more fields in this step:
- Virtual IP — a single address for the whole cluster and its entry point. Use a free address on the same network as the nodes, so a cluster whose nodes sit on
192.168.1.0/24takes a virtual IP such as192.168.1.224. Do not reuse an address already assigned to a device. - Synctime — the interval, in seconds, between status synchronizations across nodes. It accepts a real number over
0.005.
The Virtual IP does not belong to the Default address Pool range. The address pool is the internal network Swarm hands out to containers; the virtual IP lives on the nodes' own network. An address from the wrong network is accepted without any warning and fails silently later, so check the range before continuing. See Cluster networking.
Step 2 — Node details
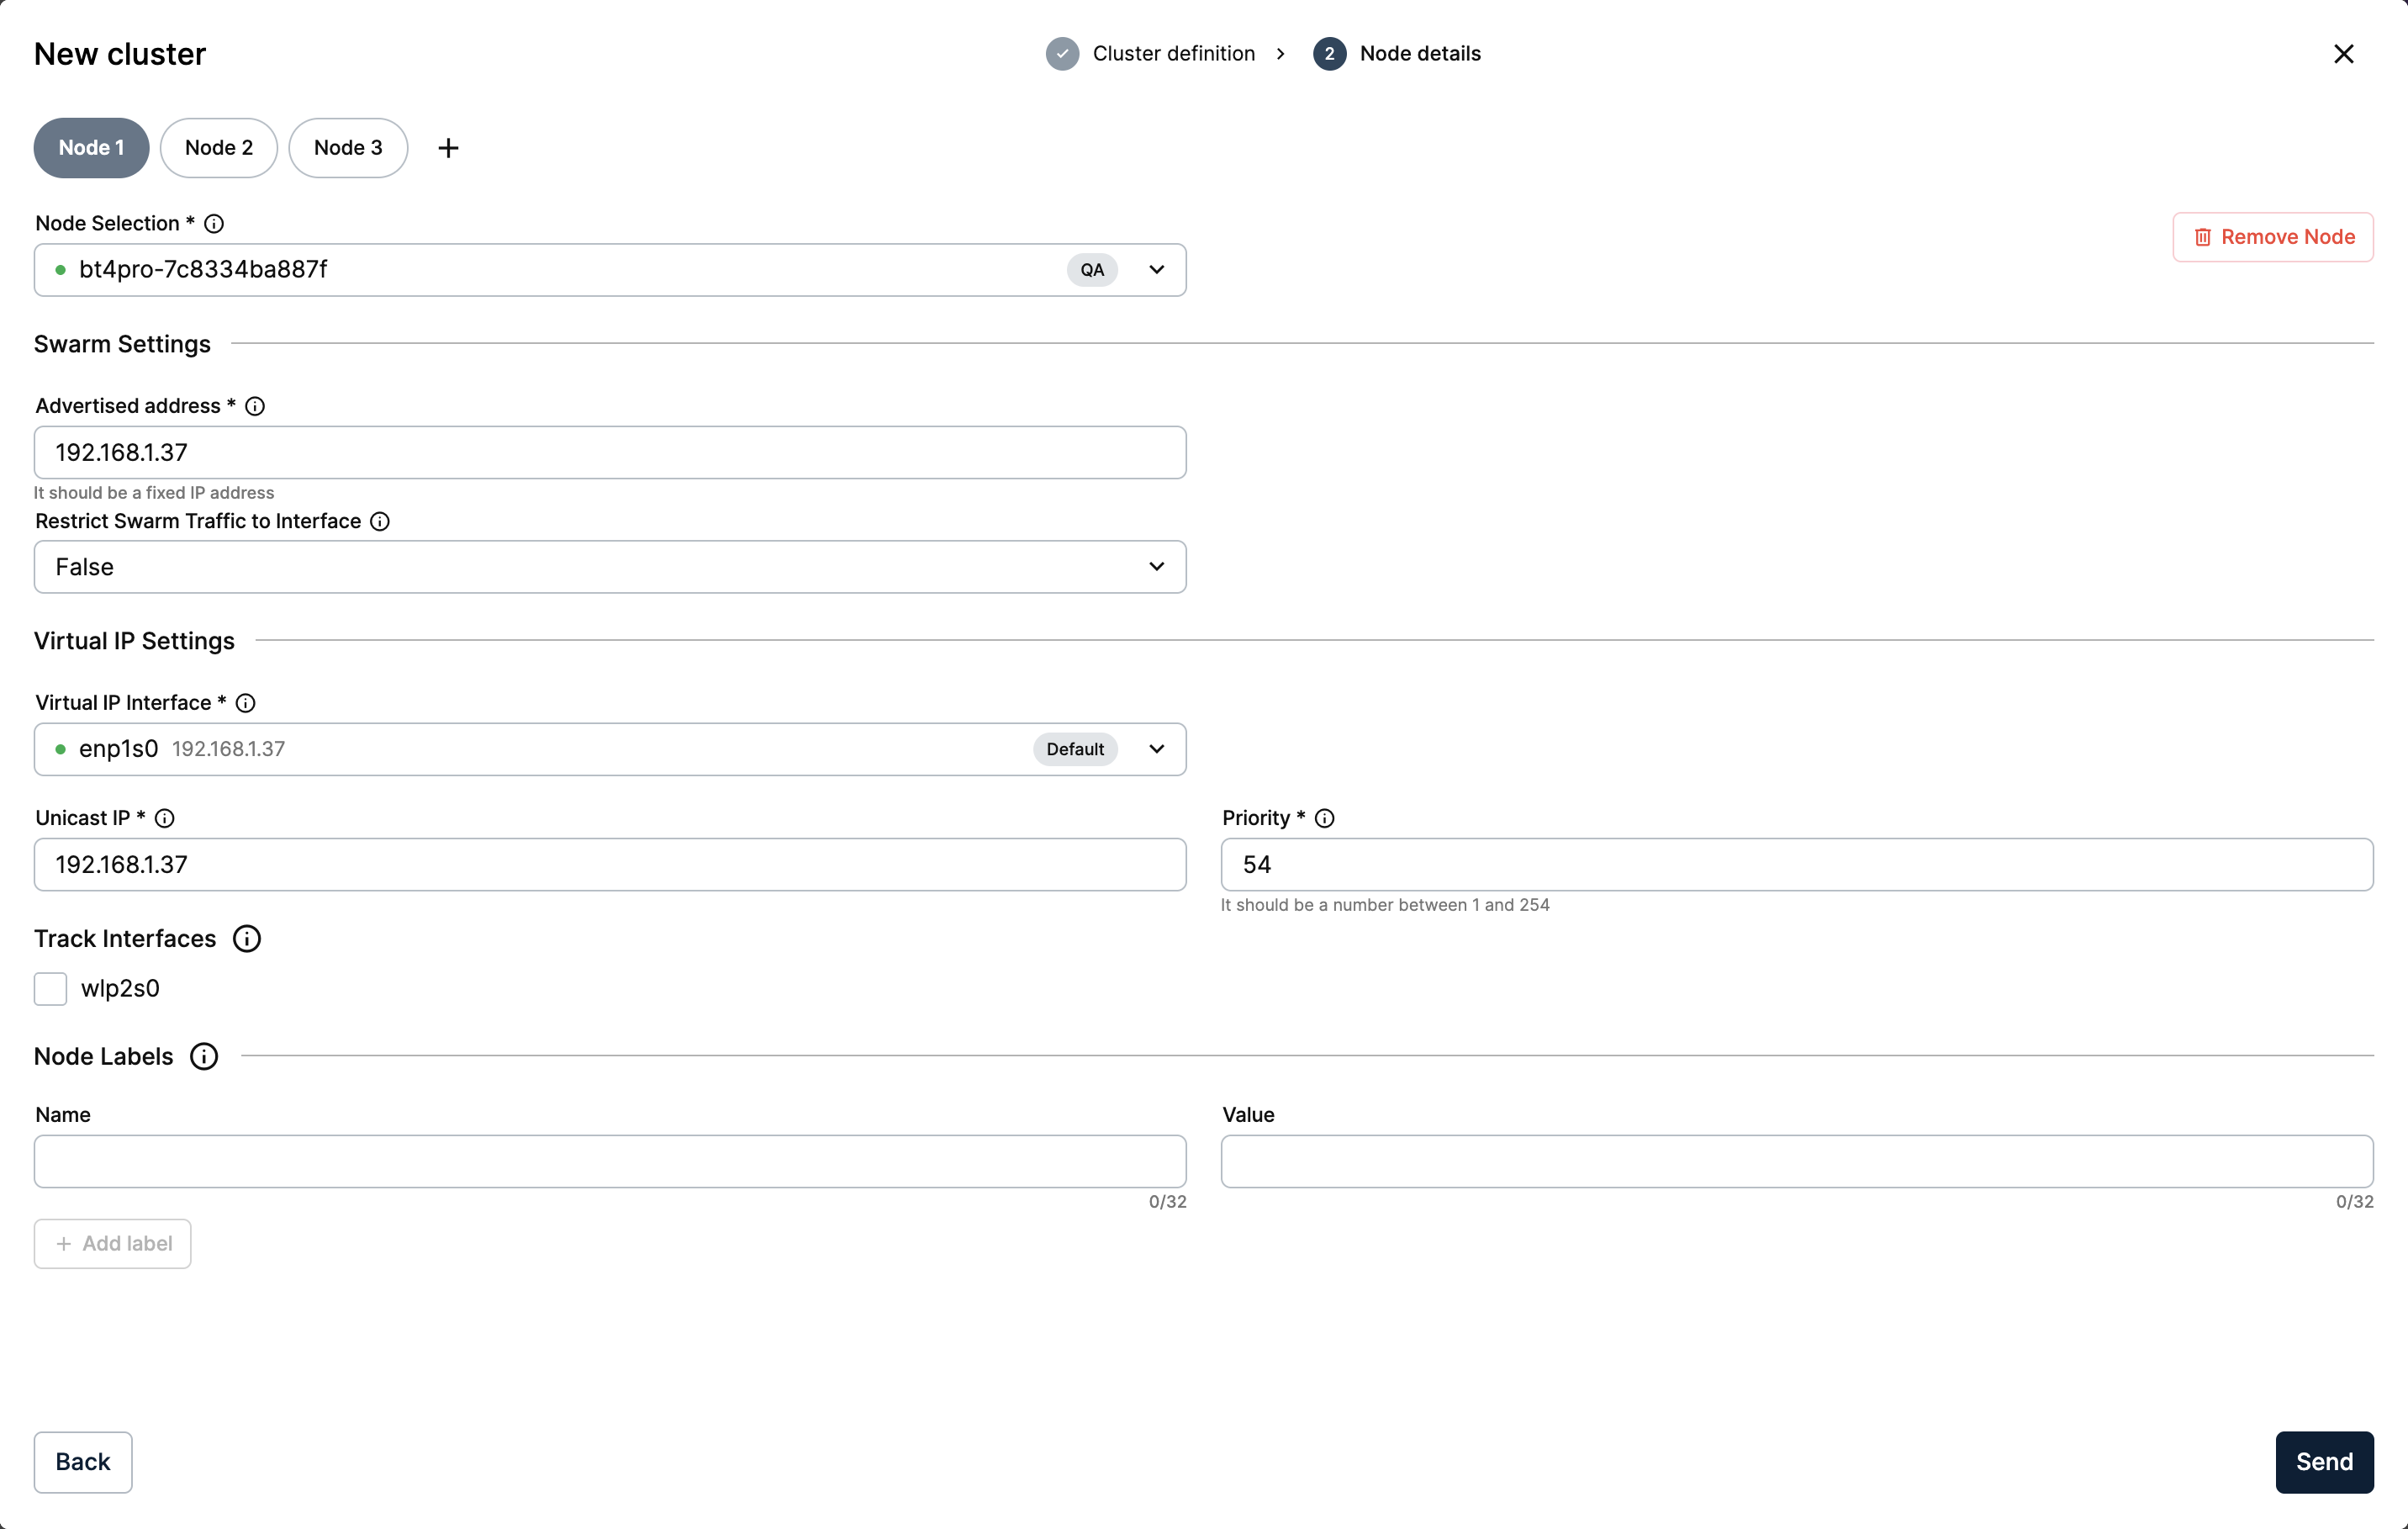
Node details
Each node gets its own tab. Configure the first node, then use + to add another tab, and Remove Node to drop one.
Node Selection picks the Edge Node, and the badge beside each name shows the group it belongs to. Every node in a cluster must belong to the same group, so once you pick the first node the dropdown lists only nodes from its group.
Under Swarm Settings:
- Advertised address — the node's fixed IP address, which Swarm advertises to the other members. It must be a real, fixed address of that node.
- Restrict Swarm Traffic to Interface — set to True to pin Swarm traffic to a single network interface. Default False.
Under Node Labels, the labels already defined for the cluster appear as chips. Select a chip to assign that label to the node, and clear it to remove the assignment. To define a new label, fill in Name and Value, both up to 32 characters, and select Add label.
For High Availability to work correctly, a cluster needs a minimum of three nodes. Fewer nodes still form a working Swarm, but the cluster loses quorum as soon as one node goes down. Add every node here with + before you finish: growing a cluster afterwards is considerably more involved.
On a single-node cluster with Enable Cluster Volumes set to True, the shared volume is not created yet. It stays pending until a second node joins, and creating shared volumes before that fails because the shared storage does not exist.
Virtual IP settings per node
When the virtual IP is enabled, each node tab gains a Virtual IP Settings section. These values are what make failover work, so fill them in on every node: a node left without them stays out of the election and never takes over the virtual IP.
- Virtual IP Interface — the node's network interface that will announce the virtual IP. The dropdown lists each interface with its current address and marks the node's default one, for example
eth1 192.168.1.37. - Unicast IP — the node's own fixed address, which it uses to send heartbeat signals to the other nodes so that the virtual IP can move elsewhere if this node fails. It must be on the same network as the virtual IP and the other nodes, and it normally matches the Advertised address.
- Priority — a number between
1and254. Higher values indicate greater preference for virtual IP assignment, so in a three-node cluster you might rank them3,2, and1. - Track Interfaces — the interfaces to monitor to check whether the node is still suitable to hold the virtual IP. The section appears only once you have selected a Virtual IP Interface and the node has other interfaces available.
Select Send to create the cluster. It then appears in the Clusters view.
Neither Barbara nor Docker Swarm checks that the Unicast IP is on the nodes' network. Any syntactically valid address is accepted, and a wrong one breaks failover at runtime without reporting an error. Check the network portion of every address yourself before creating the cluster.
Editing a cluster
The edit action in the Clusters view reopens the same two steps as Edit cluster, showing the cluster's current configuration. Only the Cluster name is saved: the addressing, the overlay network, and the node configuration are fixed once Swarm has formed, and any change you make to them there is discarded. To change the cluster's topology, delete it and create it again.
Summary
The Clusters view is where you inventory and operate your High Availability clusters, and the two-step Add Cluster wizard is where you build them. Cluster definition covers the cluster as a whole, including the virtual IP and the Swarm overlay range, while Node details covers membership, per-node addressing, and labels. Enabling the virtual IP adds fields to both steps, and every one of them takes an address from your own network.
Barbara collects all of it in a single form and configures Swarm and KeepAlived on every node for you, so a multi-node cluster comes up without per-node work on site.
Next, see Cluster Details to operate a cluster once it exists.