Barbara Core Manager
This article refers to Platform v2.9.0. The current Platform version is v3.3.0.
Overview
Barbara Core Manager brings the Barbara Platform runtime to general-purpose servers, industrial PCs, and virtual machines. A Core instance is created locally on your own infrastructure using an interactive wizard that walks you through CPU, RAM, disk, networking, and port forwarding.
This article covers:
- Installing Barbara Core Manager on supported Linux distributions.
- Running the interactive wizard to create a Core instance.
- What each wizard step does and why it matters.
- How to register the resulting Core in Barbara Panel.
- How to read the local status view once the instance is running.
Every screen shown here reflects the actual text and layout that appears in the terminal.
Installing Barbara Core Manager
Barbara Core Manager is distributed as a compressed .tar.gz archive. Each archive contains prebuilt packages for a specific Linux family.
Supported distributions:
- Ubuntu — Jammy (22.04 LTS), Noble (24.04 LTS).
- Debian — Bullseye (11), Bookworm (12), Trixie (13).
- RHEL / AlmaLinux — 8, 9, 10.
The internal package naming uses either Ubuntu/Debian codenames or RHEL-style el suffixes:
- Ubuntu:
barbara-core-manager_<version>~jammy1_amd64.debbarbara-core-manager_<version>~noble1_amd64.deb
- Debian:
barbara-core-manager_<version>~bullseye1_amd64.debbarbara-core-manager_<version>~bookworm1_amd64.debbarbara-core-manager_<version>~trixie1_amd64.deb
- RHEL / AlmaLinux:
barbara-core-manager-<version>.el8.x86_64.rpmbarbara-core-manager-<version>.el9.x86_64.rpmbarbara-core-manager-<version>.el10.x86_64.rpm
RHEL and AlmaLinux use the same el8, el9, el10 convention and are binary-compatible for these packages.
Download from Barbara Panel
- Log into Barbara Panel.
- Open the OS Images view.
- Make sure the Barbara OS filter is active.
- Find the row that matches your host:
- Core for Ubuntu — if the host runs Ubuntu.
- Core for Debian — if the host runs Debian.
- Core for RHEL — if the host runs RHEL or AlmaLinux.
- Click the Download icon to retrieve the corresponding
.tar.gz.
You will get an archive named similarly to:
core-for-ubuntu-<version>.tar.gz
core-for-debian-<version>.tar.gz
core-for-rhel-<version>.tar.gz
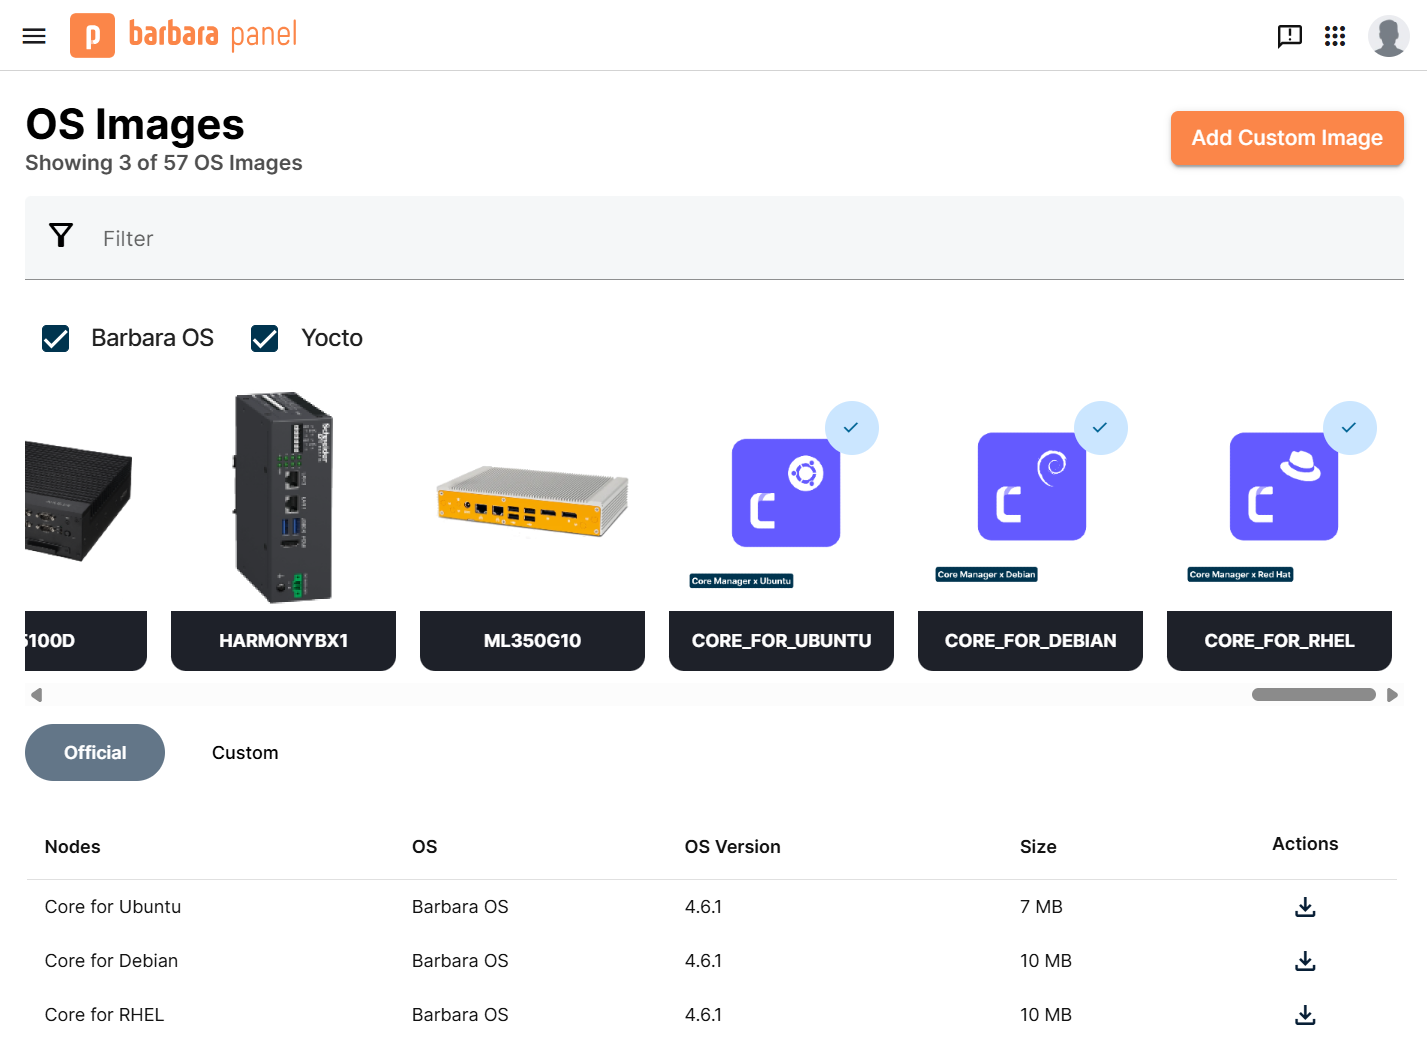
OS Images view showing the Core packages
Extract the archive
Copy the .tar.gz to the target machine (or download it directly there) and extract it:
tar -xvf core-for-ubuntu-<version>.tar.gz
# or
tar -xvf core-for-debian-<version>.tar.gz
# or
tar -xvf core-for-rhel-<version>.tar.gz
You will find the .deb or .rpm packages corresponding to each supported release.
Install the package
Ubuntu / Debian — choose the .deb that matches your distribution codename and install it with apt:
sudo apt install ./barbara-core-manager_<version>~jammy1_amd64.deb
# or ./barbara-core-manager_<version>~noble1_amd64.deb
# or ./barbara-core-manager_<version>~bullseye1_amd64.deb
# etc.
RHEL / AlmaLinux — choose the .rpm that matches your major version and install it with dnf:
sudo dnf install ./barbara-core-manager-<version>.el8.x86_64.rpm
# or ./barbara-core-manager-<version>.el9.x86_64.rpm
# or ./barbara-core-manager-<version>.el10.x86_64.rpm
Run the manager
Installation creates a binary named barbara-core-manager. Because it needs to create and manage Core instances and configure virtual networking and NAT, it must run with root privileges:
sudo barbara-core-manager
This launches the interactive wizard documented below.
Wizard walkthrough
Step 1 — Welcome
When you run barbara-core-manager on a system where no Core instance has been created yet, the wizard greets you with:
Barbara Core Manager

No Barbara Core was found.

This setup wizard will guide you through configuring a new Barbara Core instance.

You will be asked to specify:
  • Number of CPU cores
  • Amount of RAM in MB
  • Disk size in GB
  • NAT network IP range
  • Host network interface for port forwarding
  • Port forwarding rules

Press → or Enter to begin, or 'q' to quit.
The tool checked the system, did not find an existing Core instance, and lists what it will ask you. Nothing is provisioned until you confirm the final summary.
Navigation
- → / Enter — continue to the next step.
- q — exit immediately without creating anything.
Step 2 — CPU cores
How many CPU cores do you want to assign to Barbara Core?

Host has 4 cores
Enter a value between 1 and 4.

> 2

Press → or Enter to continue, ← to go back, or 'q' to cancel.
The wizard detects the total number of cores on the host and enforces a minimum of 1 and a maximum equal to the detected count.
Recommendations
- Testing / small demos — 1 or 2 cores is usually enough.
- Production / heavier workloads — assign more cores according to the workloads you plan to deploy and the host's total capacity.
Avoid allocating all host cores to the VM unless the host is dedicated to Barbara Core; the host OS and other services need CPU cycles too.
Step 3 — RAM
How much RAM (in MiB) do you want to assign to Barbara Core?

Host has 3883 MiB available

Enter a value between 2048 and 3883.

> 2048

Press → or Enter to continue, ← to go back, or 'q' to cancel.
The wizard measures available host memory and enforces a minimum of 2048 MiB for the Core VM. This prevents under-provisioned instances that cannot run the OS and workloads reliably.
Recommendations
- 2 GiB (2048 MiB) — fine for small demos and lightweight test workloads.
- 4 GiB or more — recommended for production environments that host multiple containers or services.
Leave enough RAM on the host so that the host OS remains stable and other host processes do not run out of memory.
Step 4 — Disk size
How much disk (in GB) do you want to assign to Barbara Core?
Note: disk size cannot be modified after creation.

Host partition: 96 GiB total, 85 GiB free
Enter a value between 16 and 85 GB.

> 16

Press → or Enter to continue, ← to go back, or 'q' to cancel.
Barbara Core Manager creates a virtual disk image on a host partition; its size is fixed at creation time. The wizard enforces a minimum of 16 GB and a maximum equal to the current free space on the partition.
Disk size cannot be modified after creation. If you later need more space, you have to decommission the instance and create a new one with a larger disk. Choose carefully.
Recommendations
- 16 GB — small tests.
- 32–64 GB — reasonable for standard environments; fits the OS plus a moderate number of workloads.
- > 64 GB — appropriate when the node will store significant application data locally.
Leave extra free space on the host partition for other host services and system updates.
Step 5 — NAT network IP range
Select the IP range (CIDR) for the Barbara Core network:

> 192.168.234.0/24

Press Enter to confirm, or 'q' to quit.
Barbara Core Manager creates a private, isolated network dedicated to the Core instance. It uses a NAT gateway; the Core VM receives its IP via DHCP from this network, and port forwarding rules (configured next) map host ports into this network.
The CIDR you select must not conflict with any network reachable from the host: host LAN segments, VPNs, corporate subnets, or other virtual networks (Docker, LXD, other hypervisors). Conflicts cause routing issues, unreachable services, or confusing failures that are hard to debug.
The wizard cannot detect every external conflict — picking a safe subnet is the operator's responsibility.
Suggested ranges
Usually safe in typical environments:
192.168.234.0/2410.123.45.0/24172.31.200.0/24
Avoid extremely common home/office ranges: 192.168.0.0/24, 192.168.1.0/24, 10.0.0.0/24.
Step 6 — Host network interface
Select host network interface for port forwarding:

 ▶ ens33 (192.168.206.128)

Use ↑/↓ to navigate, → or Enter to select, ← to go back, q to quit.
The chosen host interface receives incoming traffic and acts as the external side of the NAT configuration; when a client connects to http://<host-ip>:<port>, <host-ip> is the IP shown next to the selected interface.
The list may include physical Ethernet interfaces (eth0, ens33, enp3s0…), Wi-Fi interfaces (wlan0), and virtual interfaces (bridges, bonds, VLANs, docker bridges). Each entry shows the interface name and its primary IPv4 address.
Recommendations
- Pick the interface connected to the network where your users or systems are.
- Avoid host-only bridges or
docker0unless you have a specific reason.
Step 7 — Port forwarding rules
The last step before the summary defines which host ports get forwarded into the Core instance.
Initial screen (no rules defined yet):
Port forwarding configuration
Use this step to define port forwards for Barbara Core.
Only ports listed here will be accessible from the network.

**Note:** ports must be unique and in the range 1–65535.

Use ↑/↓ to select, 'd' to delete, 'n' to add new, Enter to continue.
Press n to add a forwarding rule:
Enter port number:
Protocol (↑/↓ to change): TCP

Press Enter to add, ← to go back, or q to quit.
You must enter a port between 1 and 65535, pick a protocol (TCP, UDP, or Both) with the arrow keys, and press Enter to confirm.
Example — HTTP on port 80
Defined forwards:
▶ 80 → TCP

Use ↑/↓ to select, 'd' to delete, 'n' to add new, Enter to continue.
Incoming traffic to port 80 on the selected host interface is forwarded to port 80 on the Core instance inside the NAT network.
Managing the list
- ↑ / ↓ — move the selection across defined rules.
- n — add a new rule.
- d — delete the currently selected rule.
- Enter — confirm the set and move to the summary.
Only forward the ports you strictly need. Common ones are 80/TCP (HTTP) and 443/TCP (HTTPS). Additional ports depend on your workloads.
Step 8 — Final configuration summary
Barbara Core configuration summary:

  • CPU cores:               2
  • RAM:                     2048 MB
  • Disk size:               16 GB
  • Network:                 192.168.30.0/24
  • Port forward interface:  ens33
  • Port forwards:
      ↳ 80 → TCP

Press Enter to create and launch the Barbara Core instance.
Press ← to go back or 'q' to quit.
This is the last chance to fix anything before Barbara Core Manager allocates compute, reserves disk space, configures the NAT and port forwards, downloads the image, and boots the VM. If something looks wrong, press ← to go back.
Step 9 — Create and launch the instance
Once confirmed, Barbara Core Manager:
- Downloads the Barbara Core image (if it is not already present).
- Validates its integrity.
- Creates the virtual disk image at the selected size.
- Configures the NAT network for the Core instance.
- Applies the port forwarding rules on the chosen host interface.
- Boots the Barbara Core virtual machine.
On success you see:
Barbara Core instance successfully created

Scan this QR code to register it:

<ASCII QR CODE>

Or alternatively, open this URL to register it:
https://panel.barbara.tech/qr?id=<barbara-id>

Press any key to exit
To register the new Core instance, scan the QR or open the URL in a browser. The <barbara-id> uniquely identifies this Core instance inside the Barbara Platform.
When you press any key, Barbara Core Manager exits but the Core instance keeps running in the background. Rerun sudo barbara-core-manager at any time to inspect or manage it.
Managing an existing Core instance
If you start Barbara Core Manager on a system where a Core instance has already been created, it skips the provisioning wizard and shows a status and actions view instead.
While the instance is still booting
Barbara Core Manager

  • Barbara Core ID: <barbara-id>
  • Status: running
  • CPU: 50.0% (2 vCPU)
  • RAM: 107 / 2048 MiB (5%)
  • Interfaces:
      • Device still booting...
  • Mounts:
      • Device still booting...
  • Port forwarding via ens33:
      • 80 (TCP)

Select an action:

 ▶ Start
   Stop
   Edit
   Delete

Use ↑/↓ to navigate, press Enter to select, 'q' to quit.
The VM is already running but the guest agent has not yet reported network interfaces or mounted filesystems. The Barbara Core ID, status, CPU/RAM allocation, and port forwarding configuration are already visible.
Once the instance is fully running
Barbara Core Manager

  • Barbara Core ID: <barbara-id>
  • Status: running
  • CPU: 4.3% (2 vCPU)
  • RAM: 1308 / 2048 MiB (63%)
  • Interfaces:
      • ens1 (52:54:00:aa:48:79)
          ↳ IP: 192.168.30.2
          ↳ RX 0.0 MB, TX 0.0 MB
      • docker0 (02:42:52:3a:54:44)
          ↳ IP: 172.17.0.1
          ↳ RX 0.0 MB, TX 0.0 MB
  • Mounts:
      • /data: 4.2/11.4 GiB
      • /cache: 0.0/0.1 GiB
      • /: 1.1/2.7 GiB
  • Port forwarding via ens33:
      • 80 (TCP)

Select an action:

 ▶ Start
   Stop
   Edit
   Delete

Use ↑/↓ to navigate, press Enter to select, 'q' to quit.
Reading the telemetry
- CPU — instantaneous CPU usage as a percentage, plus the number of vCPUs.
- RAM — current usage vs total allocated to the Core VM, plus the percentage.
- Interfaces — logical name, MAC address, IPv4 address, and RX/TX counters.
- Mounts — mountpoints inside the Core instance with used vs total capacity in GiB.
- Port forwarding — host interface and the ports/protocols exposed.
Available actions
- Start — power the VM on (no-op if already running).
- Stop — power the VM off.
- Edit — reopen the configuration wizard. The disk size step is omitted, because disk size cannot be changed once the instance has been created.
- Delete — remove the Core instance, its disk image, and its NAT network.
Summary
You installed Barbara Core Manager on a supported Linux distribution, walked through the provisioning wizard to size the Core VM and configure its NAT network and port forwarding, registered the new Core instance in Barbara Panel via QR code or URL, and learned how to read the local status view afterwards. From here, head to Barbara Panel to deploy your first workload — start with the App Library reference.