Notification rules
This article refers to Platform v3.4.0. The current Platform version is v3.4.0.
Overview
A notification rule tells Barbara which condition to watch, on which nodes, and how to notify you. You manage all your rules from the Configure Notifications popup, which you open from the Alerts screen with Configure Notifications (Alerts & Notifications in the side menu).
Rules are personal, so nothing you change here affects other users. For the concepts behind them, see Alerts and notifications.
Review your rules
The Configure Notifications popup lists every rule you own and shows the total as Defined Rules. When your account is created, it already contains two default rules: Default - Workload Unhealthy and Default - Disk Safety Action Executed. Both deliver through the Front (UI) channel to all nodes.
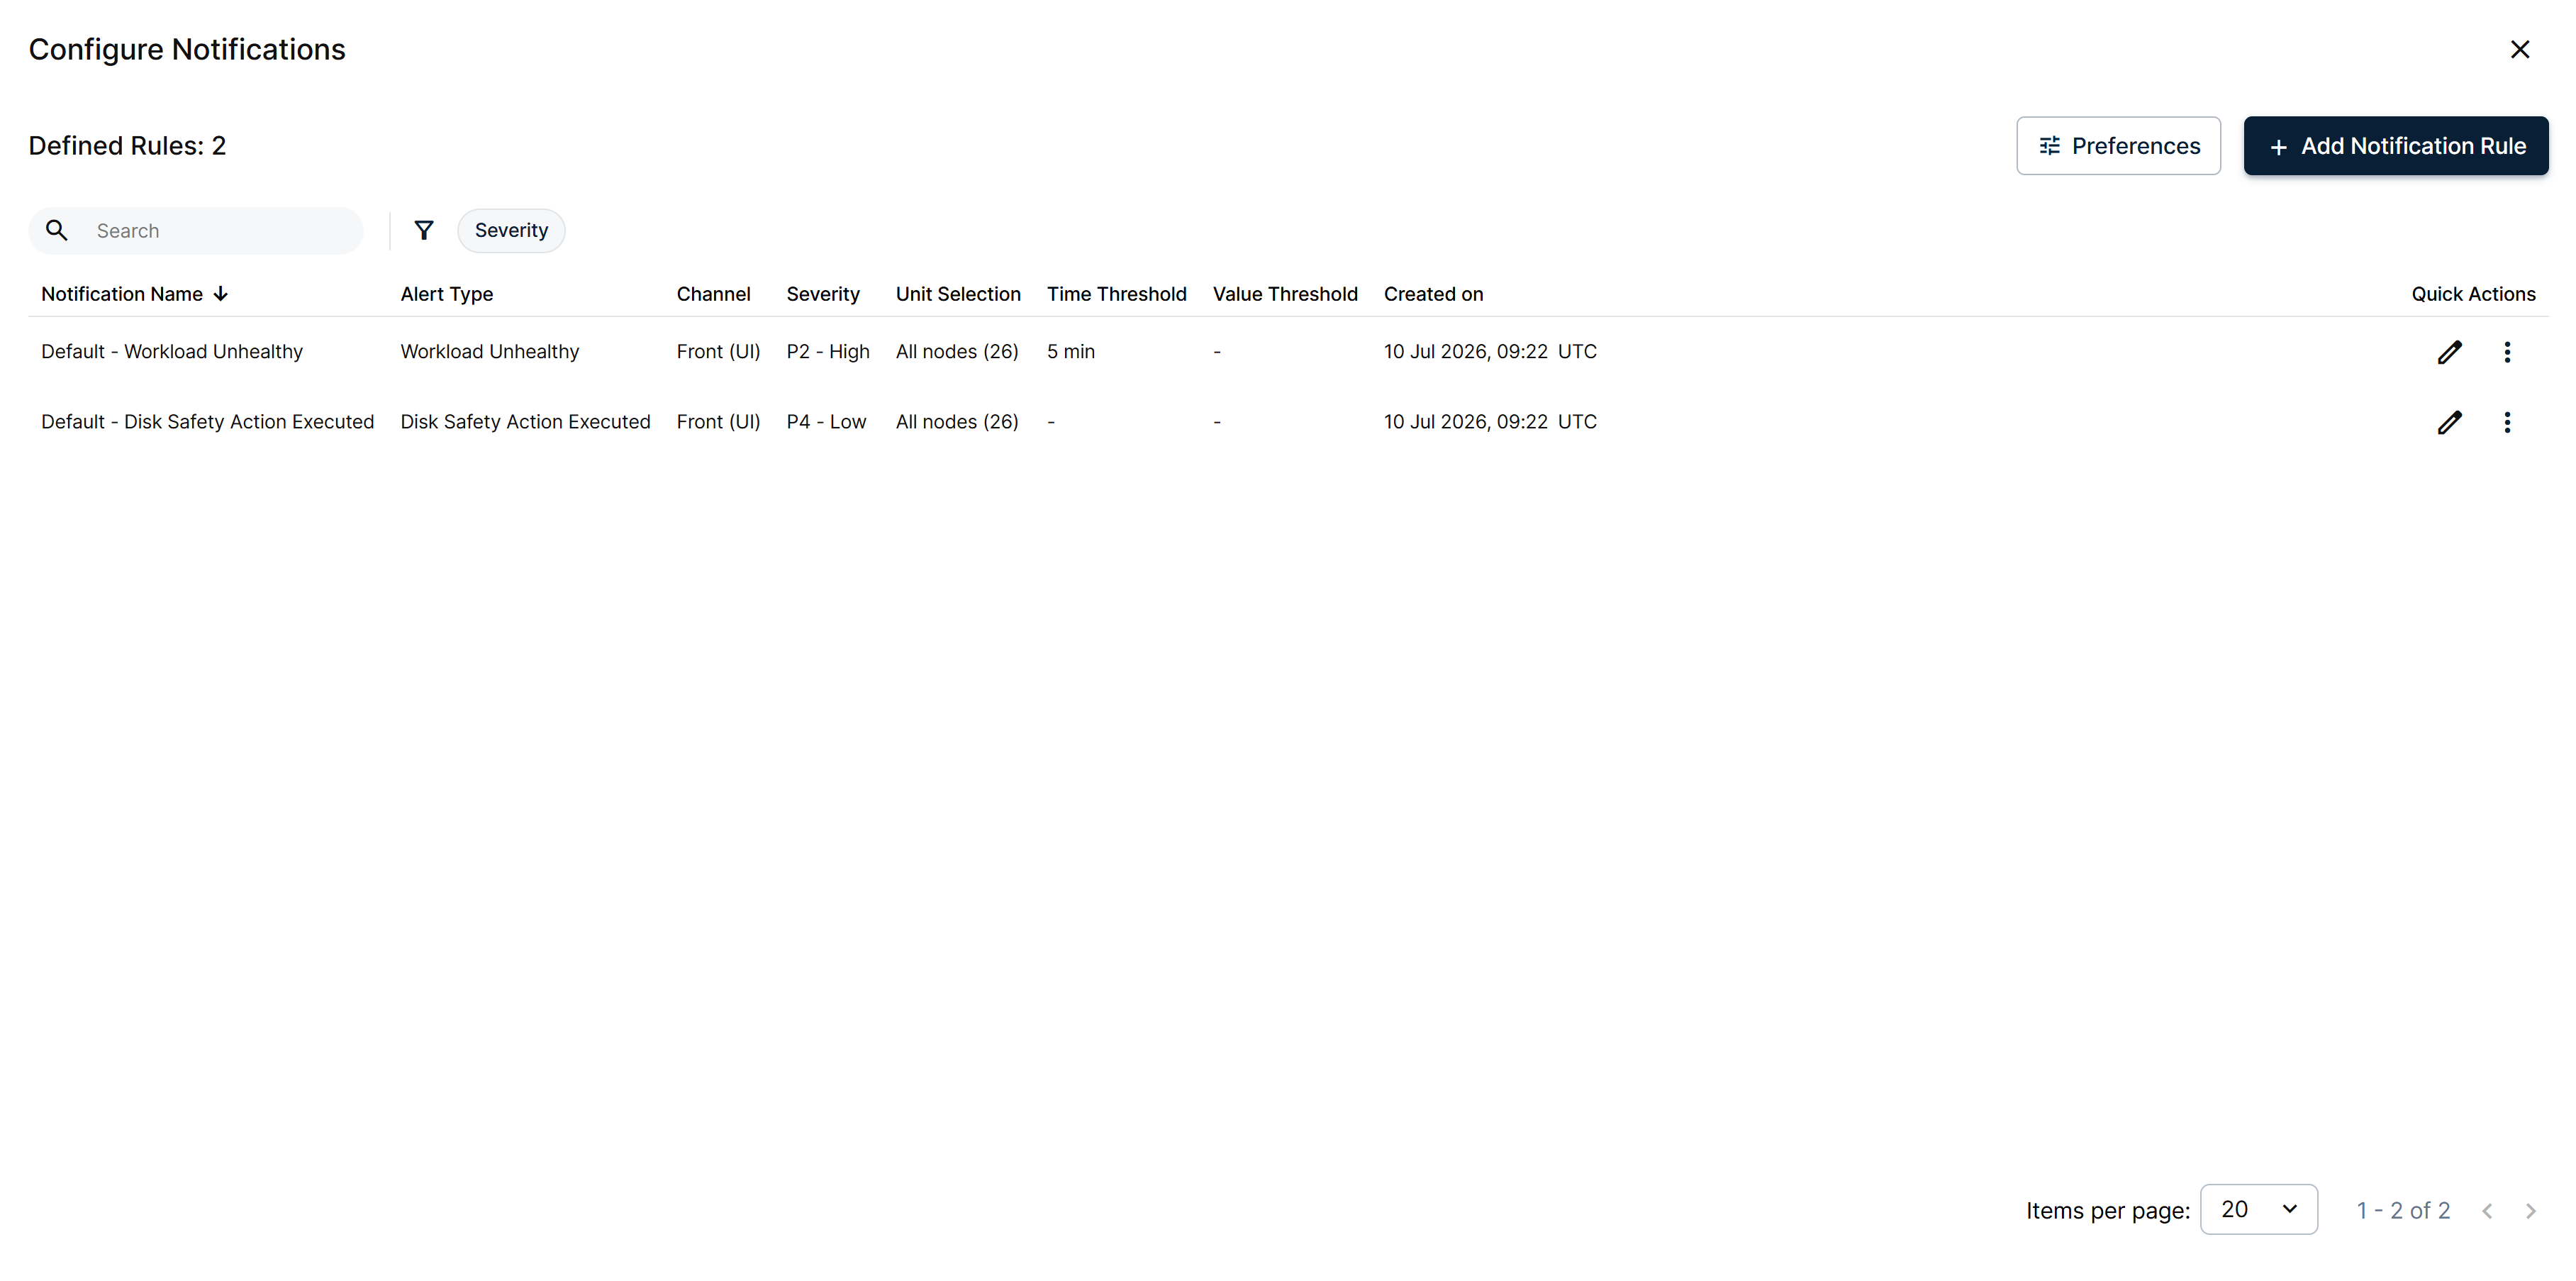
The Configure Notifications popup
The table shows:
- Notification Name: the name of the rule.
- Alert Type: the alert the rule is based on.
- Channel: the channels the rule delivers through, for example Front (UI), Email.
- Severity: the severity you assigned, for example P2 - High.
- Unit Selection: the nodes the rule covers: All nodes with the total in parentheses, for example All nodes (26), or the number of nodes when the rule covers specific ones, for example 2.
- Time Threshold and Value Threshold: the thresholds of the rule, or
-when the alert type does not use them. - Created on: when the rule was created, in UTC.
- Quick Actions: edit the rule, or open the three-dot menu for more actions.
Rules you create appear in the same table, alongside the default ones.
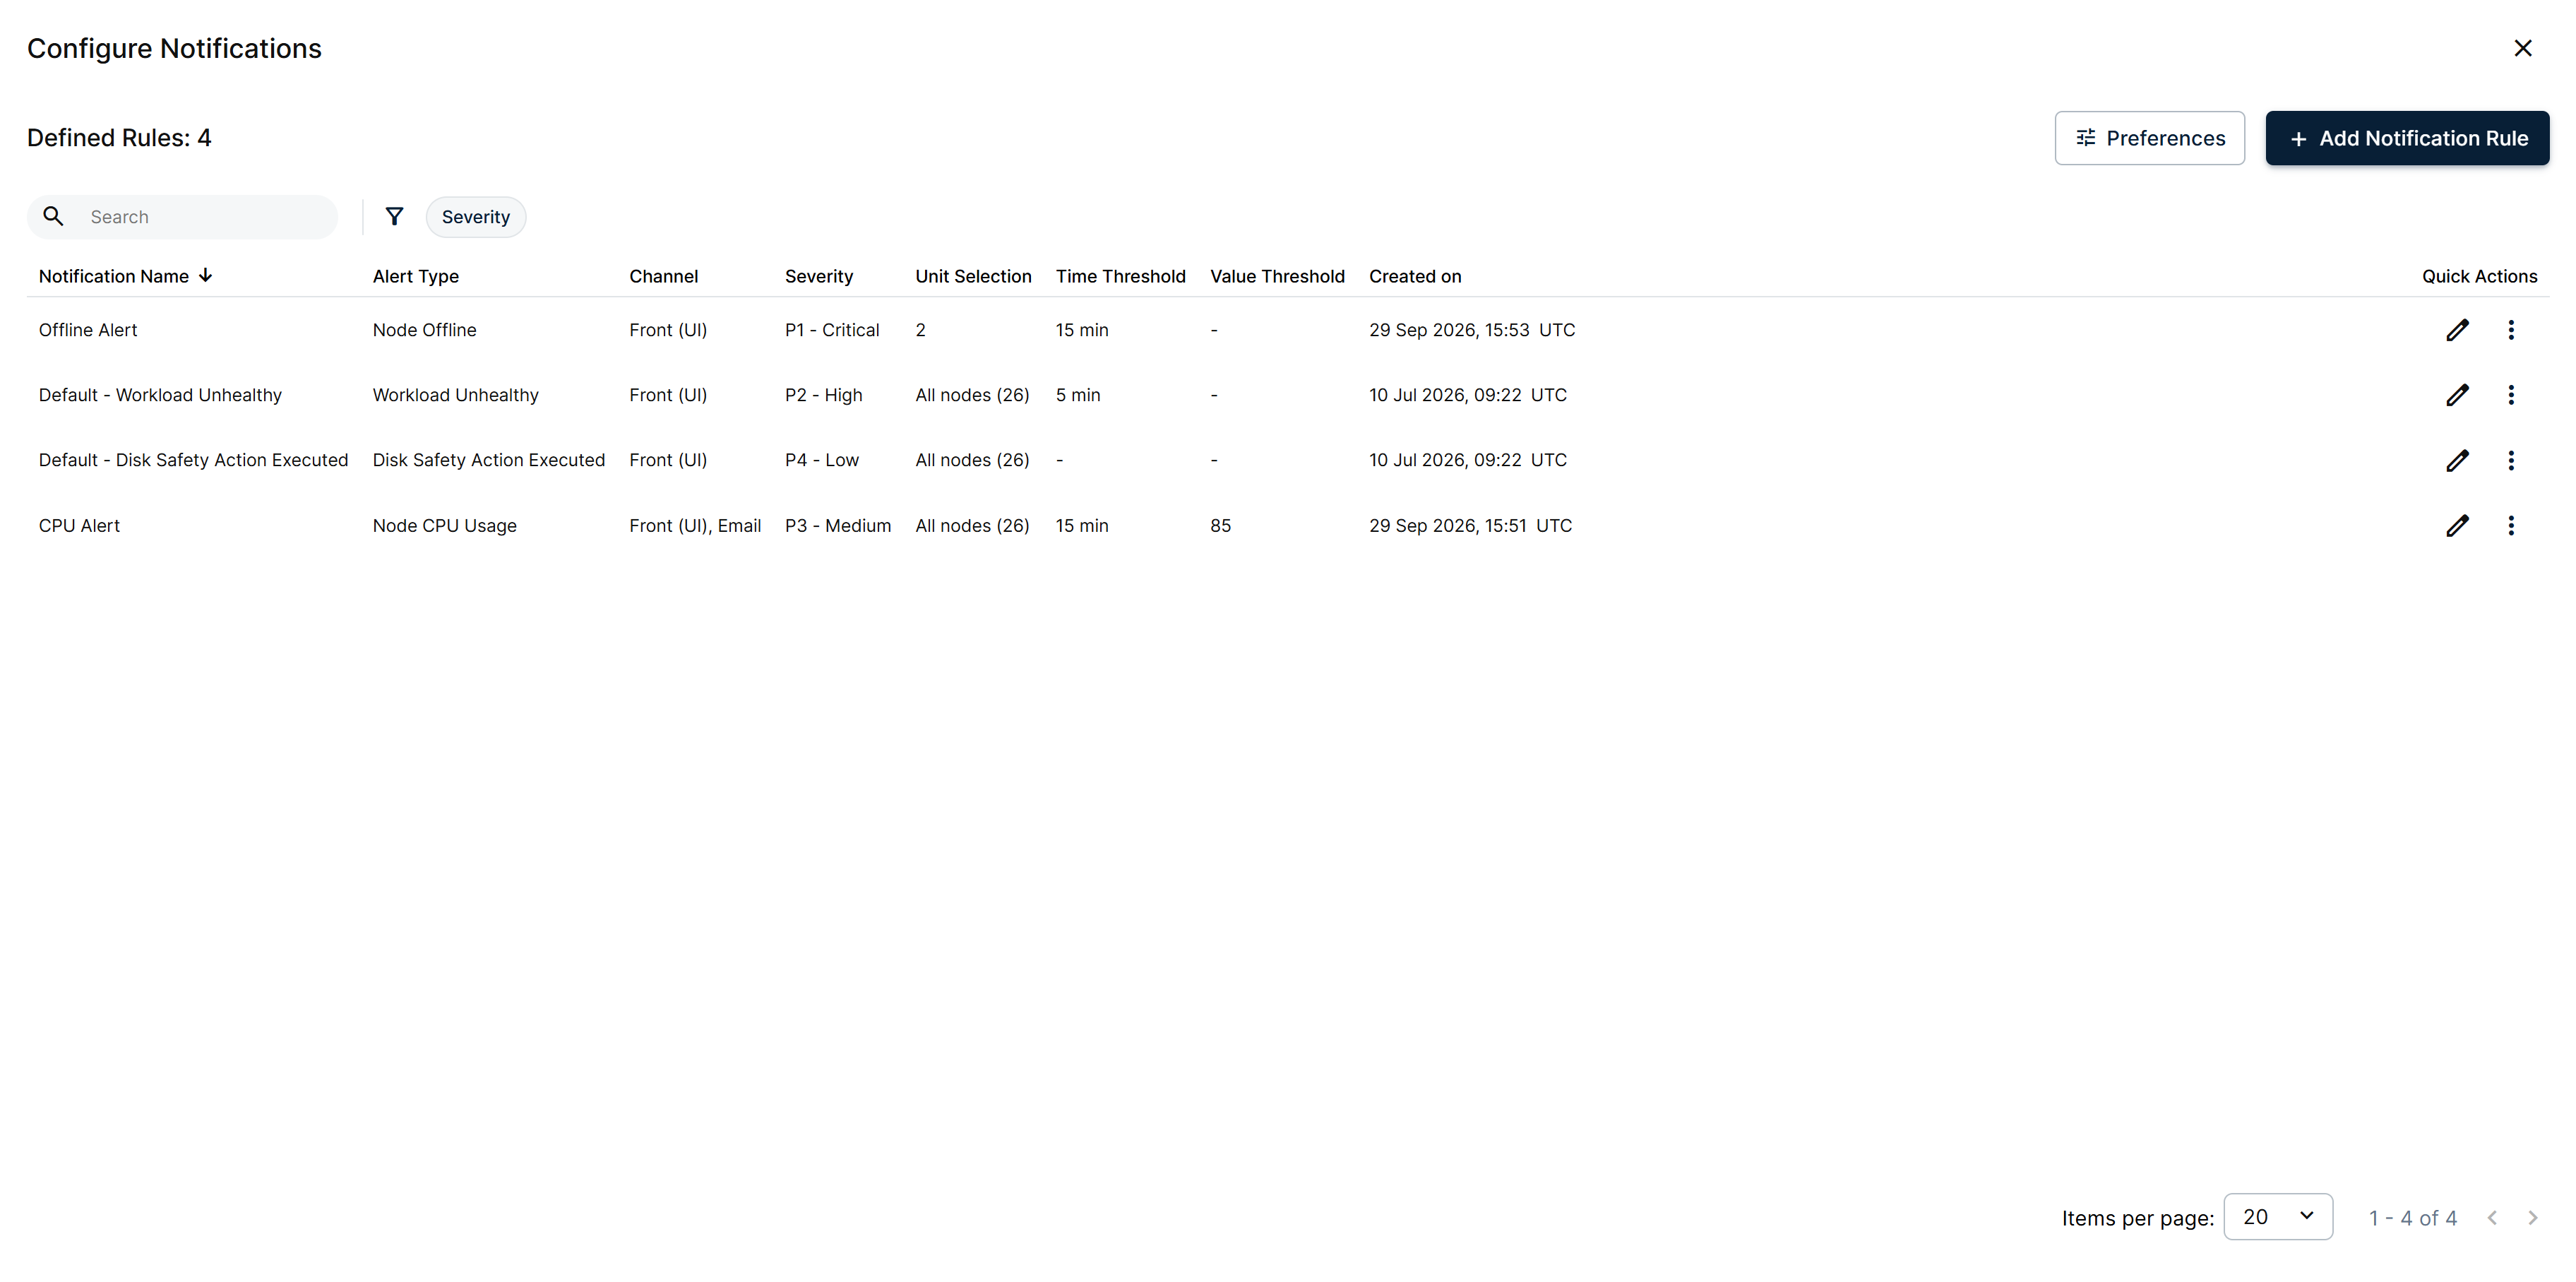
Default and custom rules
Use the search box to find a rule by name, the Severity filter to narrow the list, and Preferences to choose the visible columns. Add Notification Rule creates a new rule. If you delete every rule, the popup shows an empty state.
Add a rule
Select Add Notification Rule in the Configure Notifications popup to open the form. It is organized in three sections: Alert Specs, Impacted Nodes, and Notification Channel. Fill in the required fields and select Create rule, which stays disabled until the form is valid.
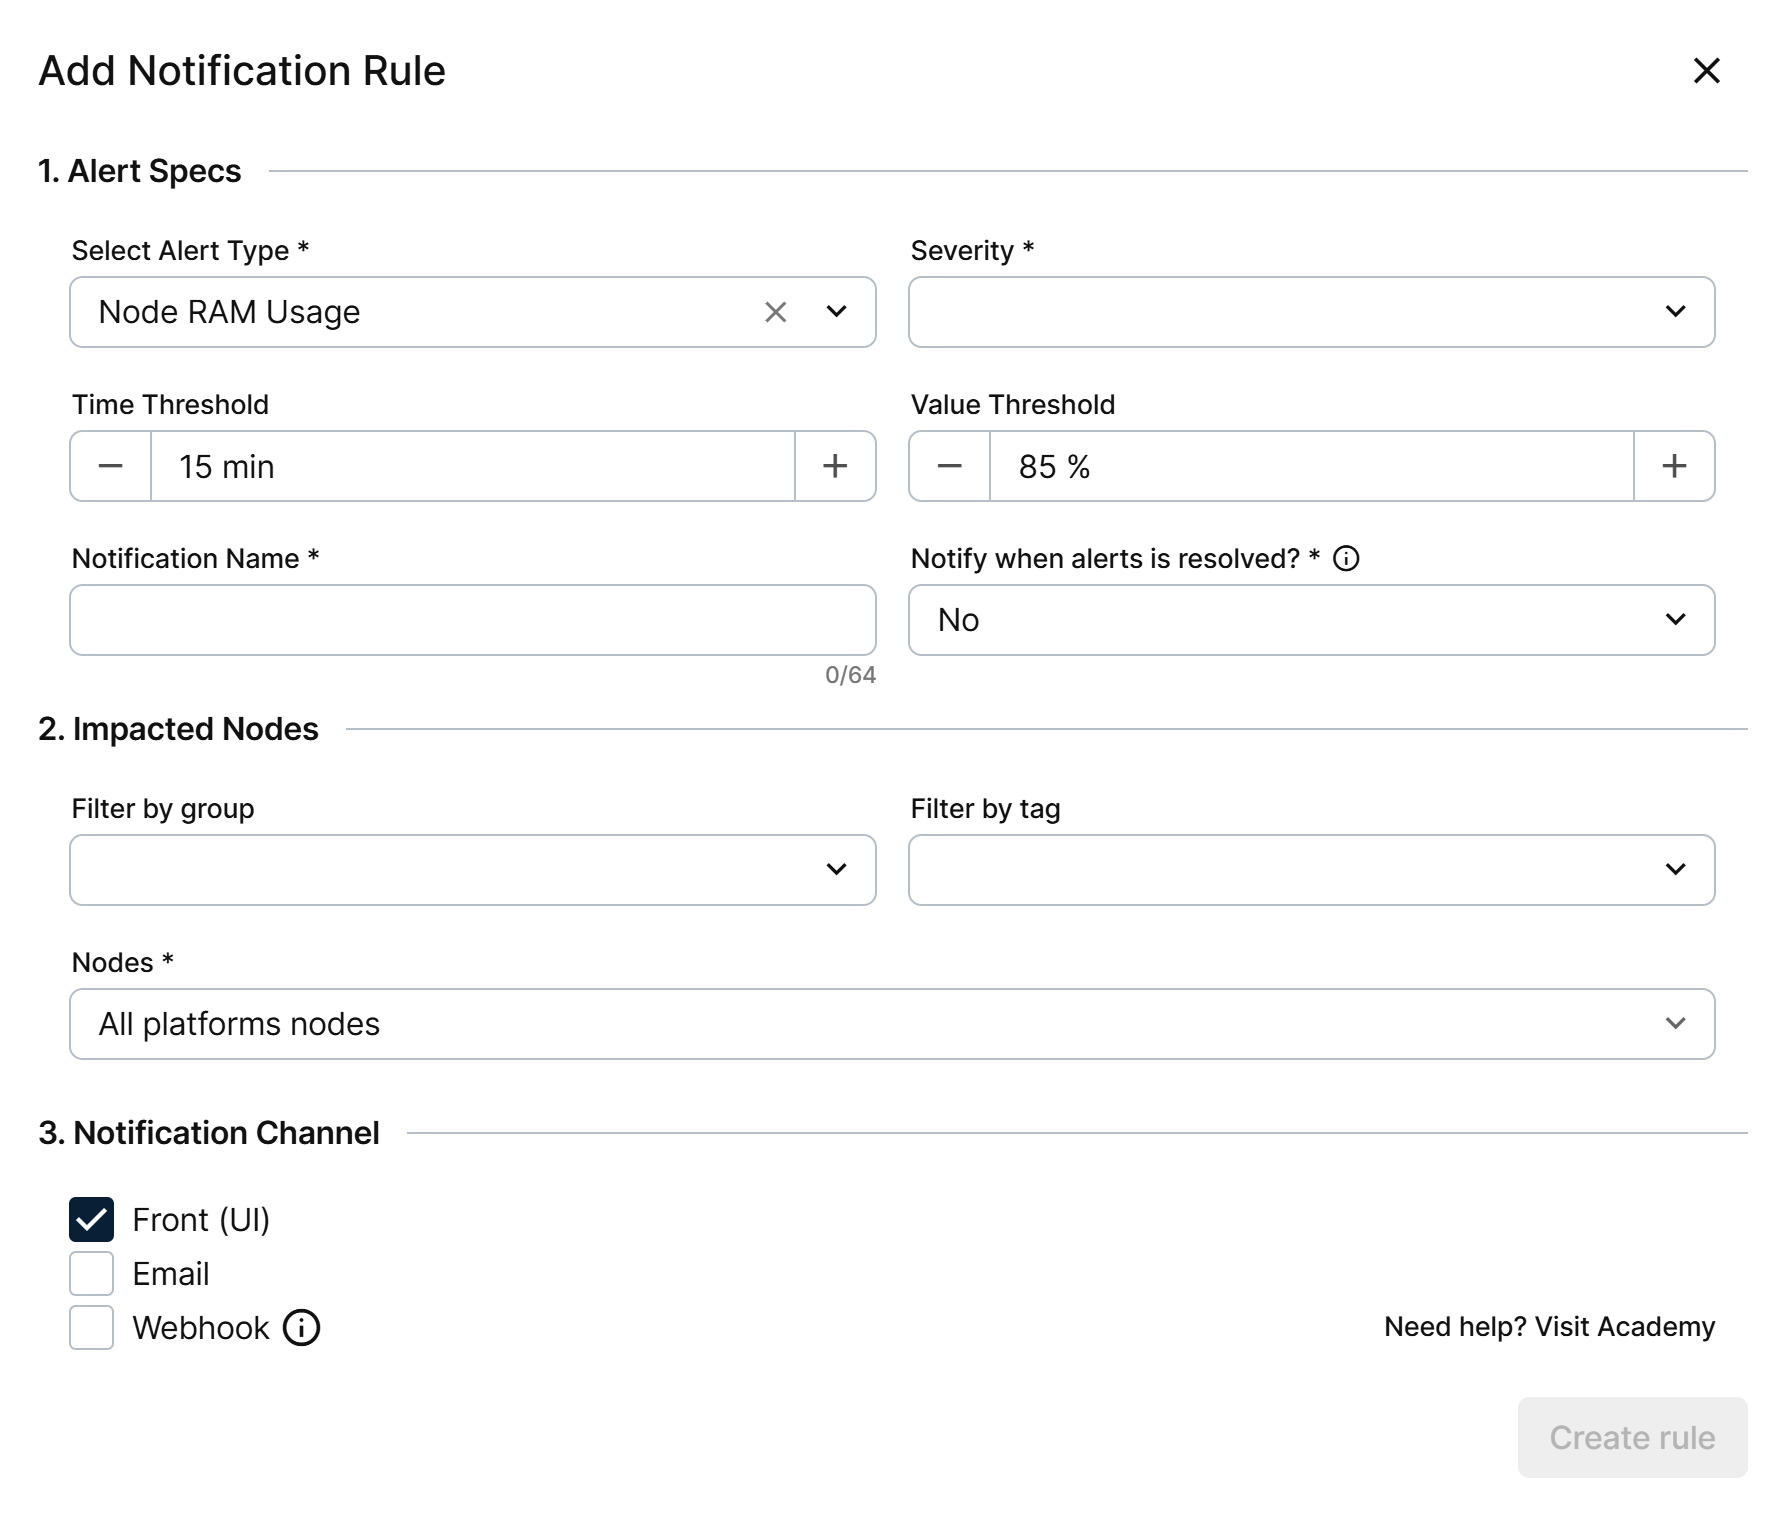
The Add Notification Rule form
1) Alert specs
This section defines what the rule watches and how it is labeled.
- Select Alert Type: choose the alert the rule is based on. The list has a search box and is limited to the alert catalog.
- Severity: choose from P1 - Critical to P5 - Informational. No severity is preselected.
- Time Threshold and Value Threshold: shown only for the alert types that use them. Use the + and - buttons to adjust them, or keep the suggested values. The alert catalog lists which alert types use them and their suggested values.
- Notification Name: enter a name for the rule, up to 64 characters. The name must be unique among your rules.
- Notify when alerts is resolved?: No by default. Select Yes to receive a second notification when the event closes.
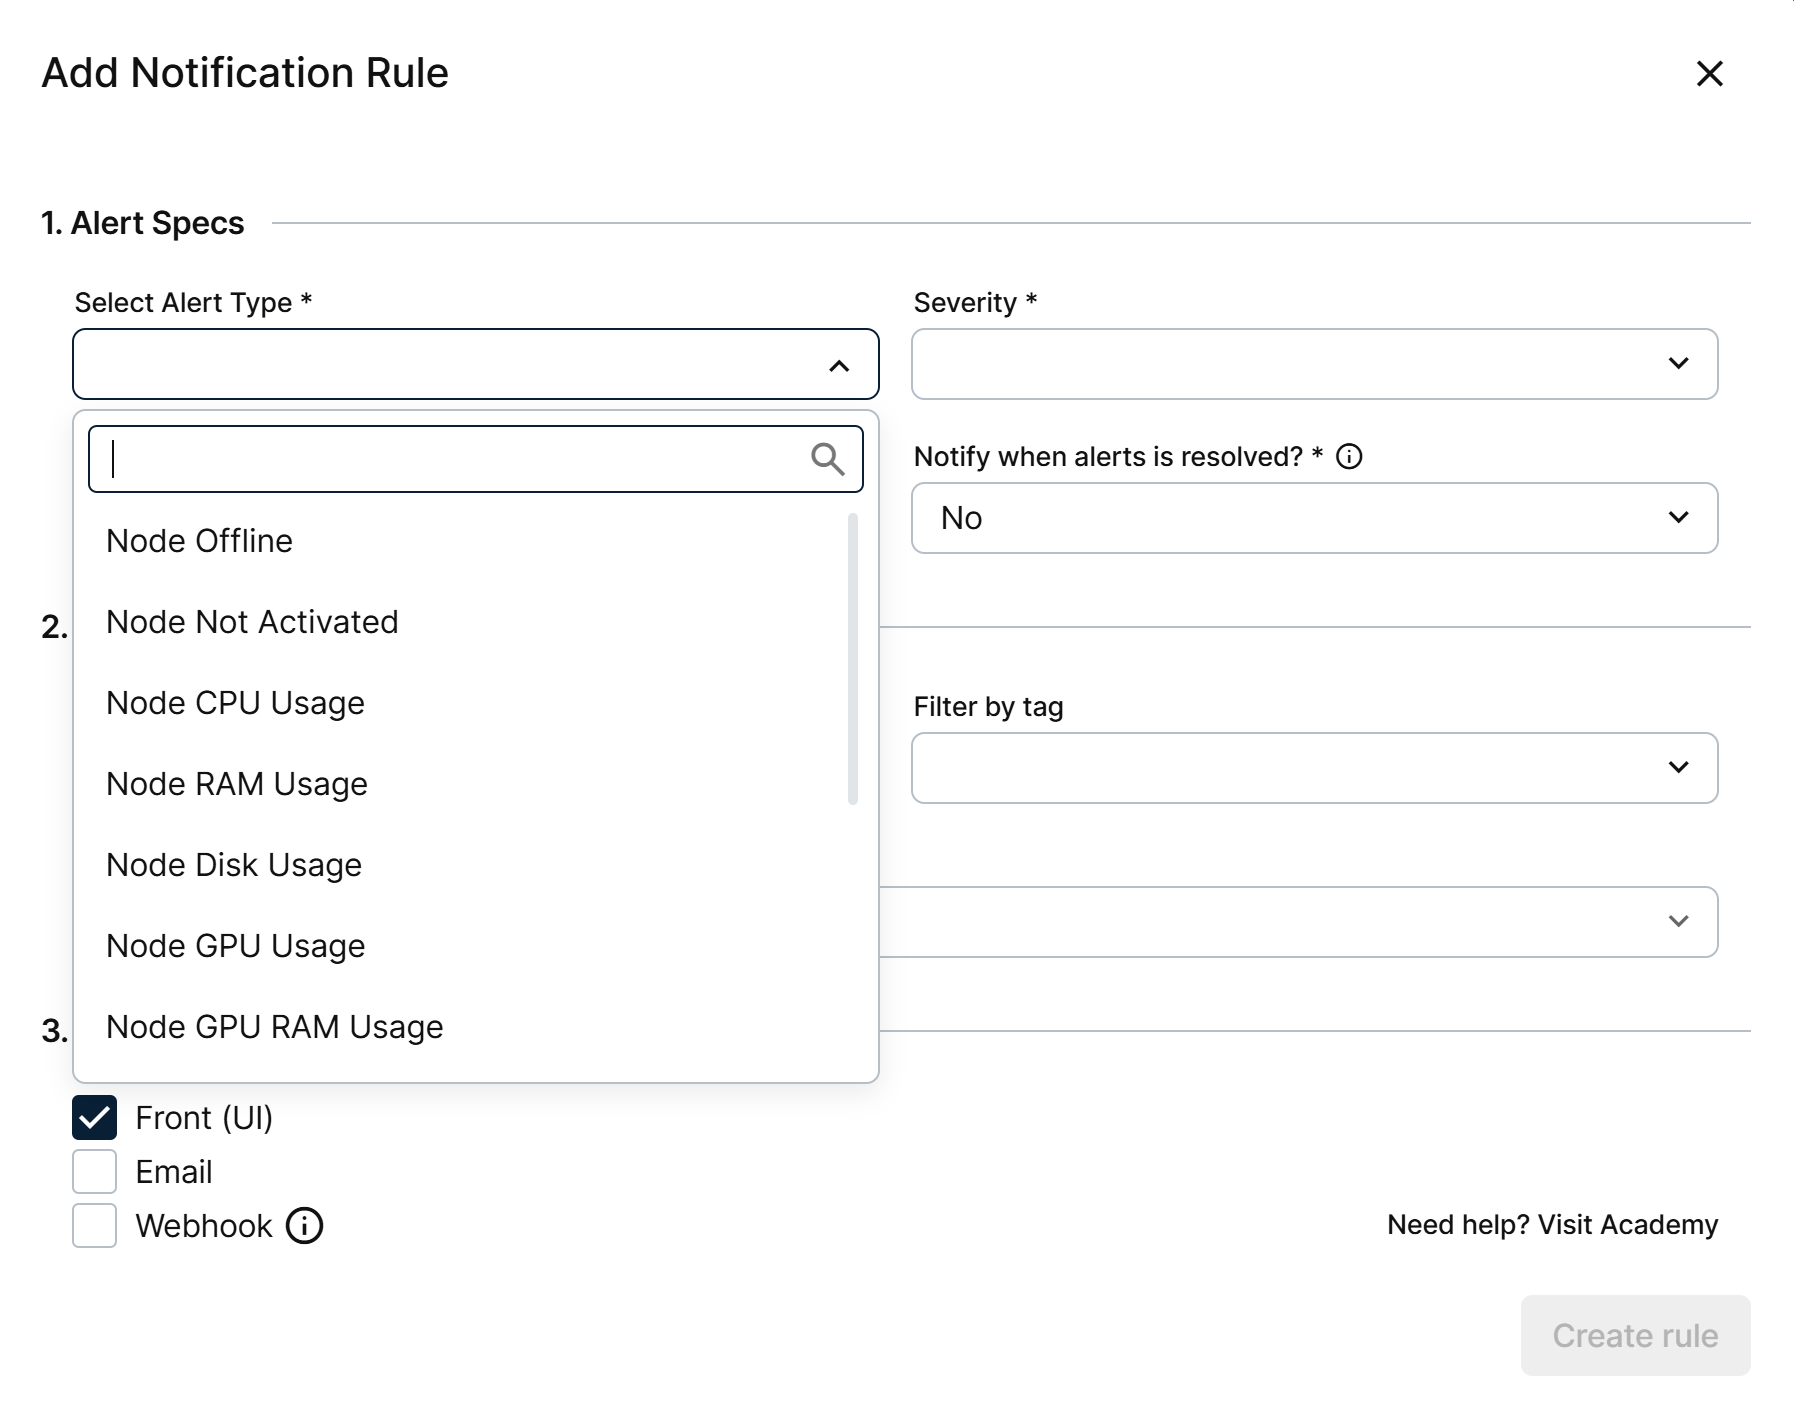
Selecting the alert type
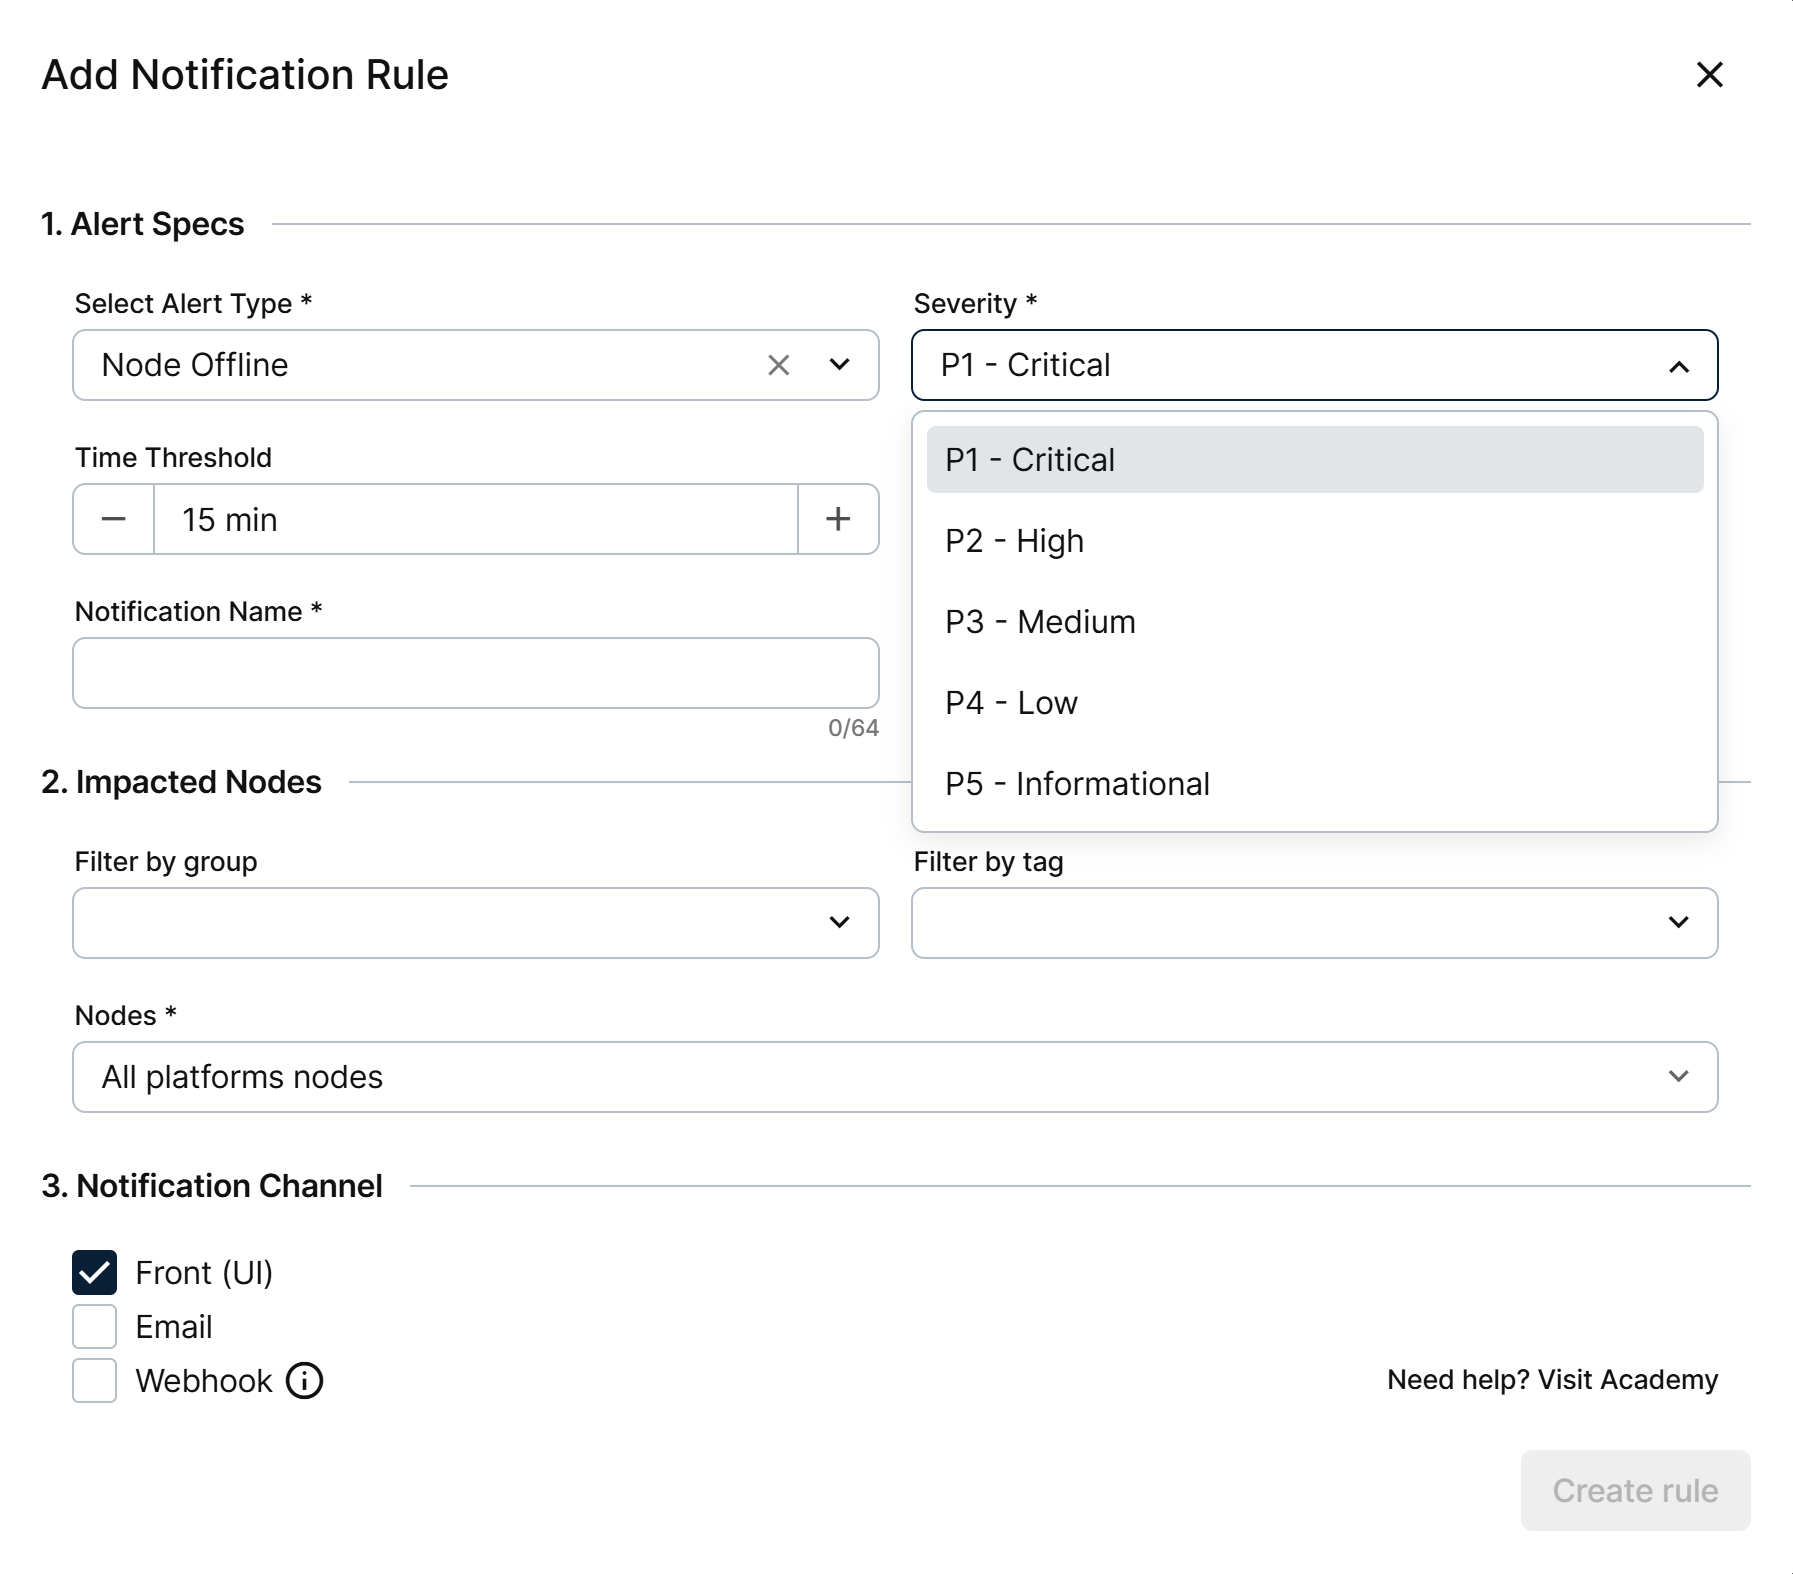
Selecting the severity
Alert types that have no thresholds, such as Node Not Activated, do not show the Time Threshold and Value Threshold fields.
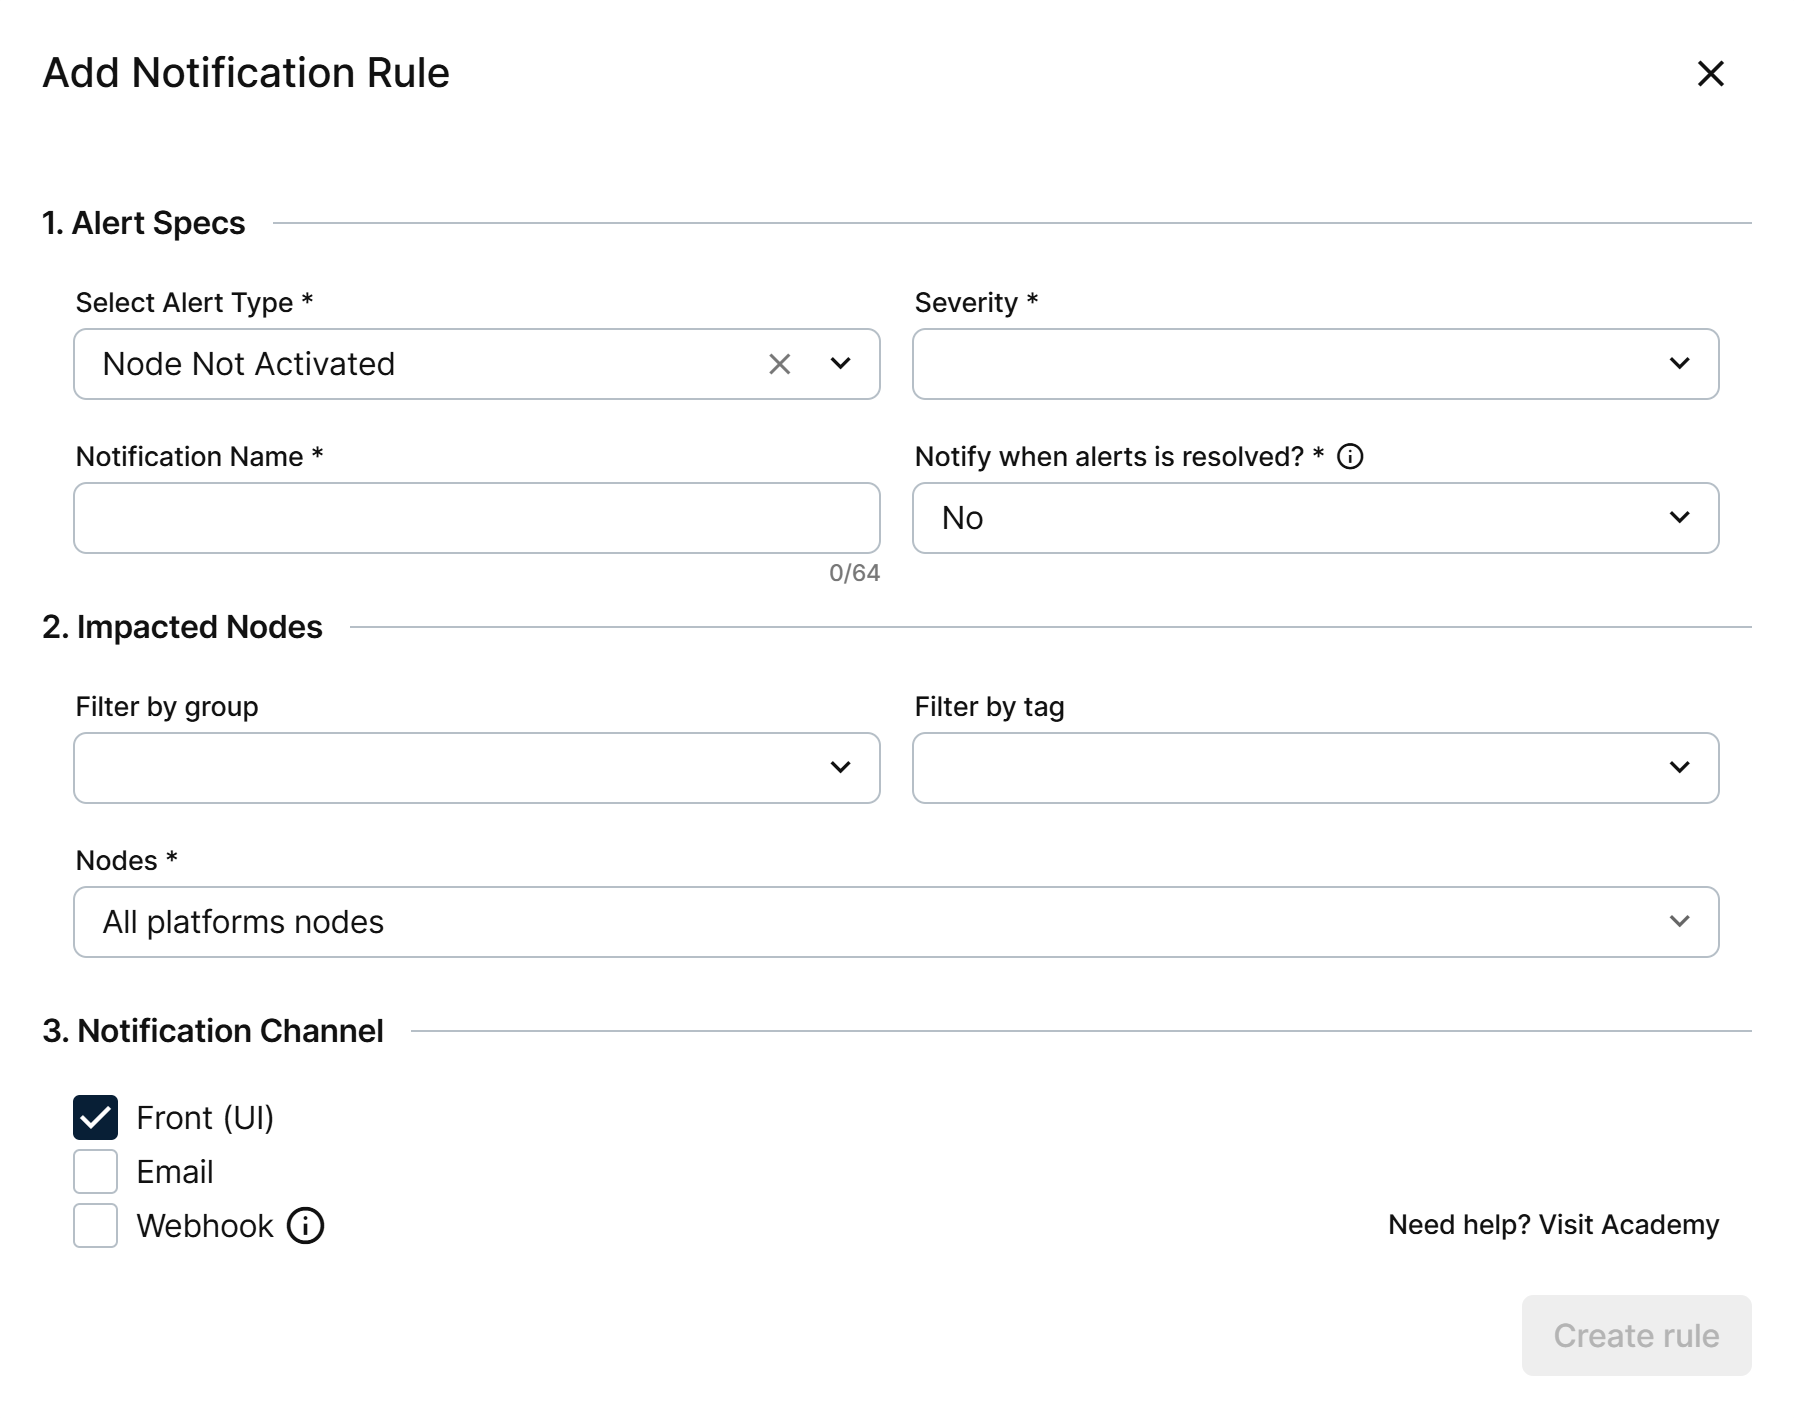
A rule without thresholds
Telemetry alerts (CPU, RAM, disk, and GPU) display a notice: telemetry rules require a minimum Barbara Core version, and nodes running an older version do not trigger these alerts. Update those nodes first; see Barbara Core updates.
2) Impacted nodes
This section defines which nodes the rule covers. Nodes is set to All platforms nodes by default, which covers every node you can access now and any node added to the platform later.
To cover specific nodes instead, open Nodes and select them from the list, which has a search box. You can narrow the list first with Filter by group or Filter by tag.
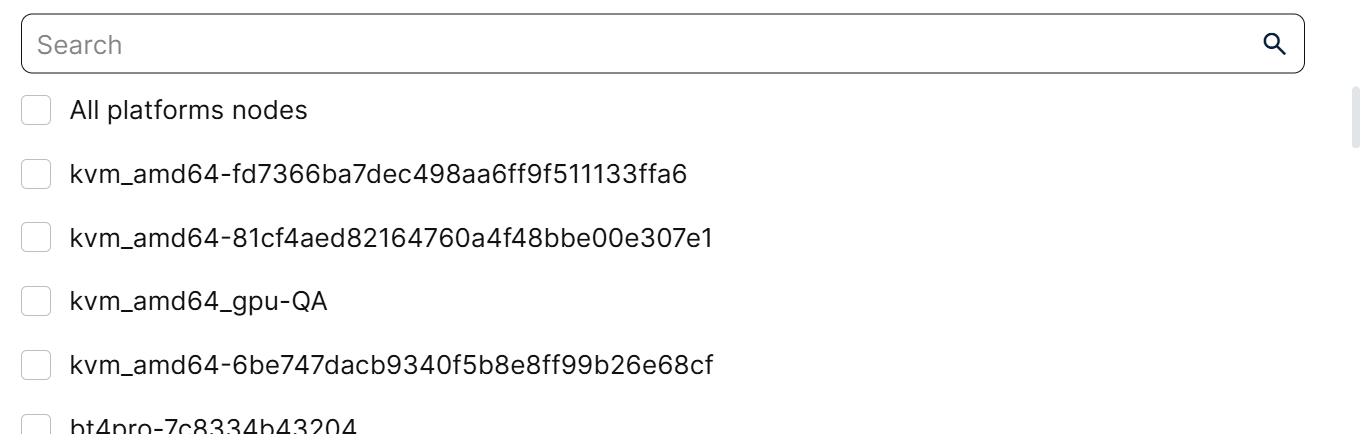
Selecting the nodes
3) Notification channel
This section defines where Barbara delivers the notification. Select at least one channel:
- Front (UI) is selected by default and can be cleared.
- Email shows an address field. Enter the recipient address.
- Webhook shows a URL field. Enter the address of the external endpoint. Use Add header to send custom HTTP headers with the request, and Test webhook to check the endpoint before you save the rule.
Each rule has its own webhook, so different rules can post to different endpoints.
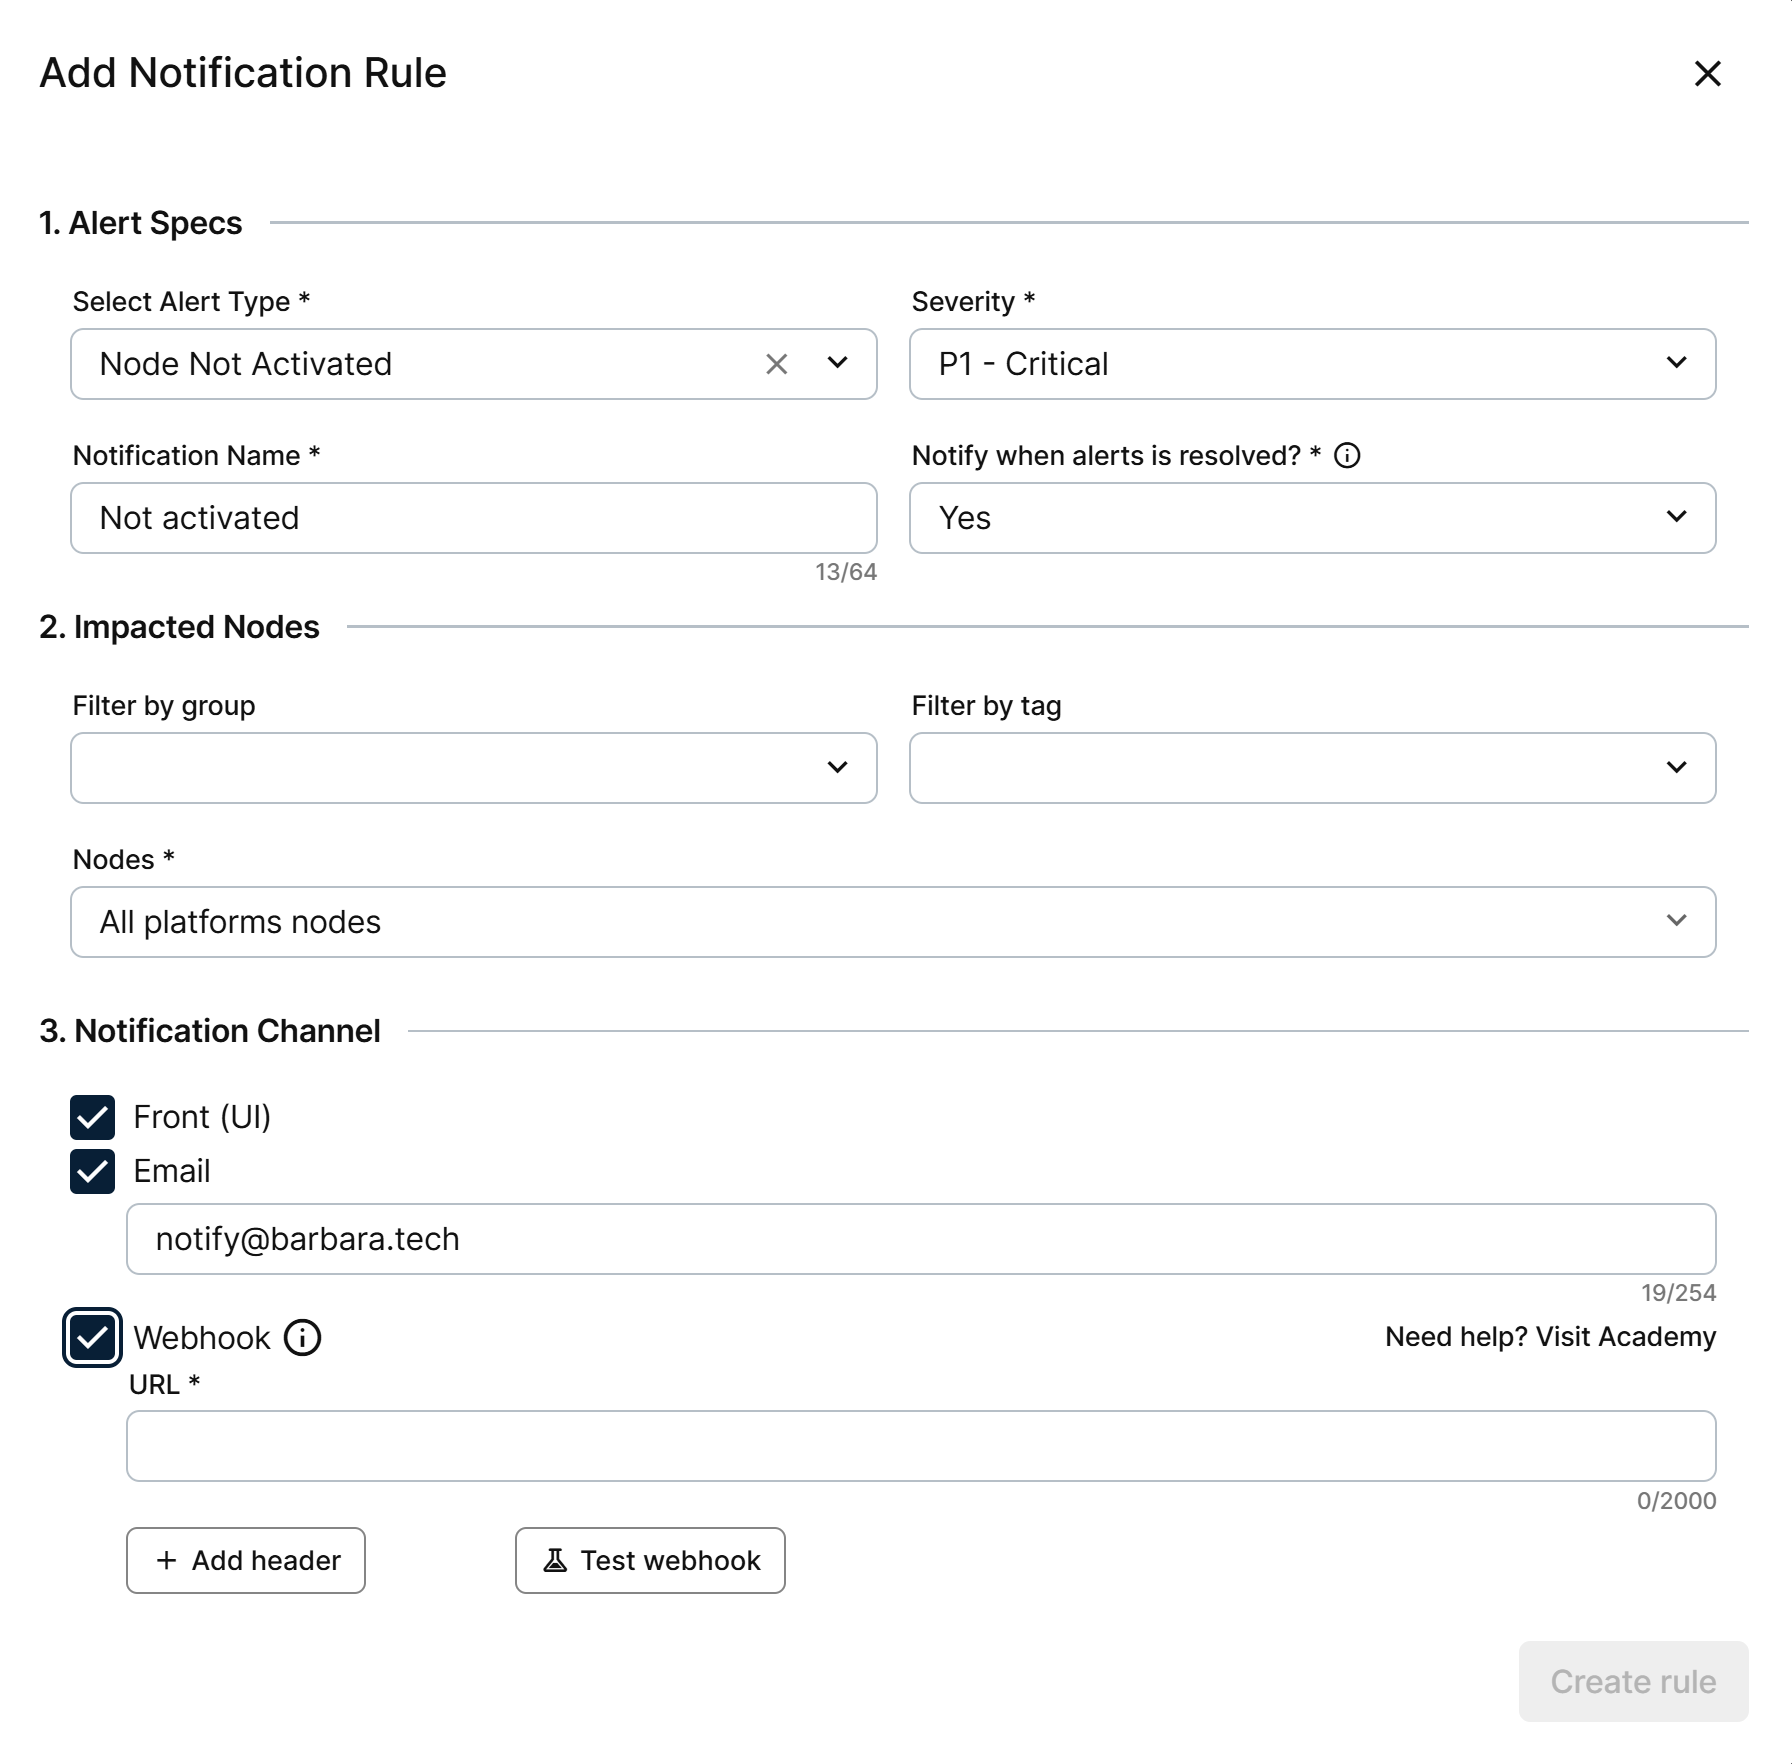
Email and webhook channels
You can create as many rules as you need, including several over the same alert type, for example an email for P2 - High and a webhook for P1 - Critical.
Edit a rule
Select the pencil icon in the Quick Actions column of a rule to open Edit Notification Rule. It has the same sections and fields as the creation form, filled with the current values of the rule. Change what you need and select Save changes.
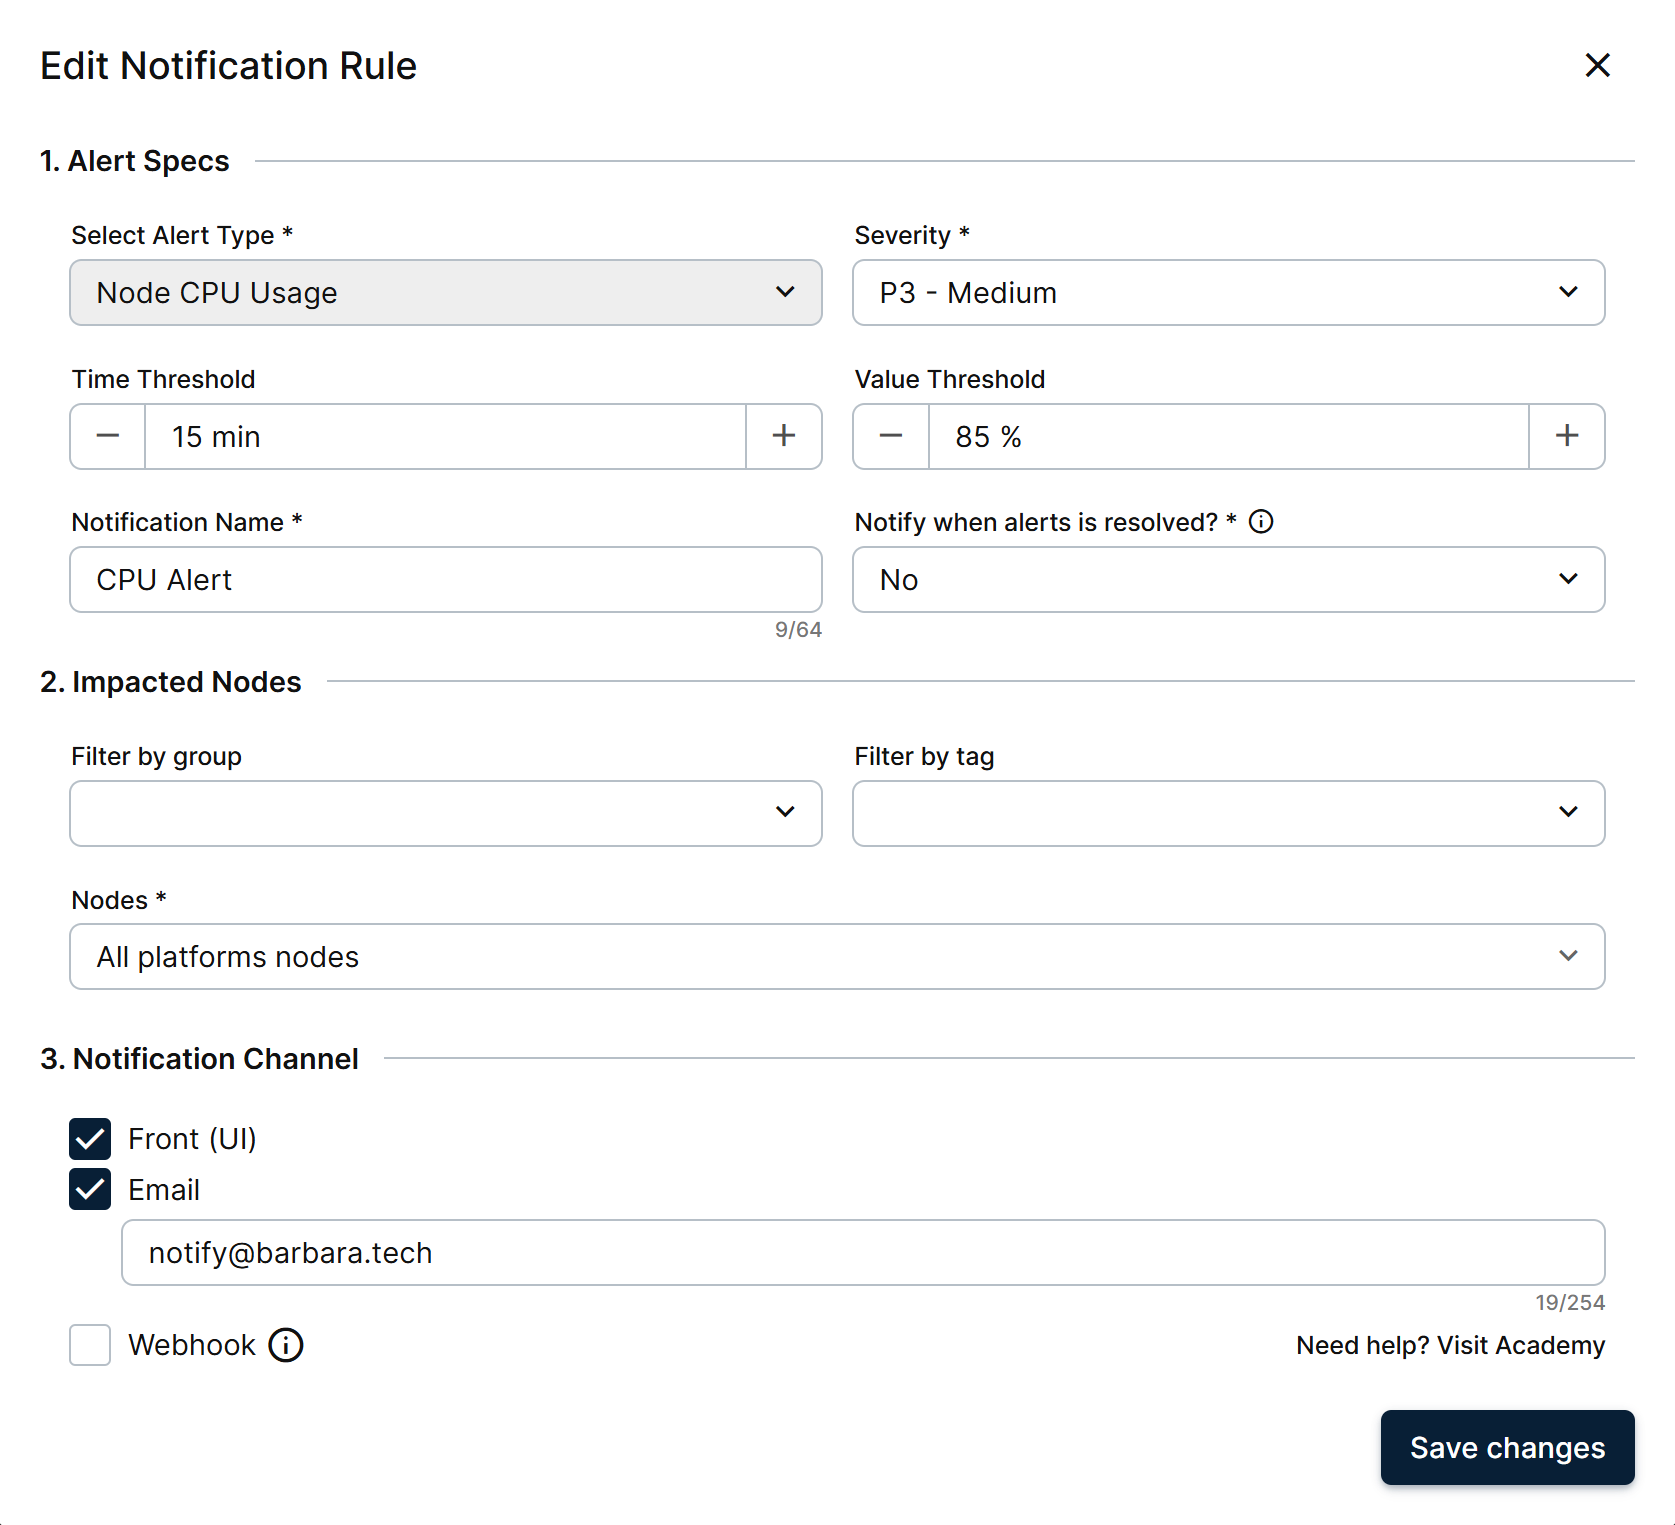
The Edit Notification Rule form
If the rule has an open event, changes do not apply to that event. The event continues with its original parameters until it closes, and the new parameters take effect from the next evaluation cycle.
Delete a rule
Open the three-dot menu in the Quick Actions column of a rule and select the delete option. The Delete Notification Rule popup shows the name of the rule and warns that it will be permanently deleted and will no longer trigger alerts or notifications. Select Delete Rule to confirm, or close the popup to keep the rule.
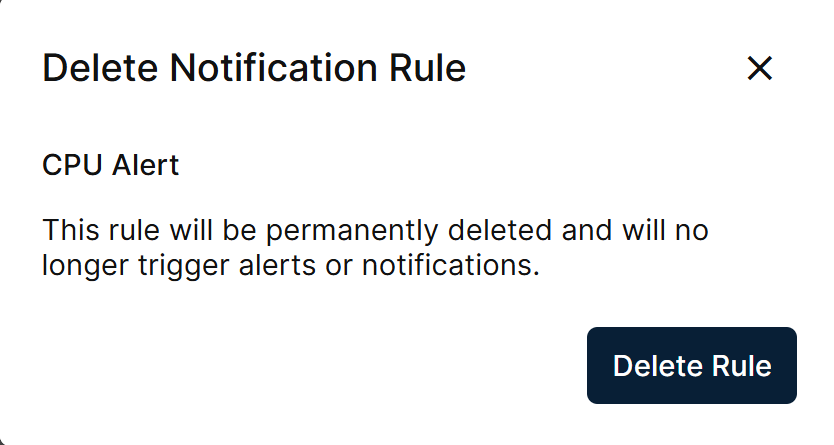
Confirming the deletion
If the rule has an open event, that event remains visible on the Alerts screen until its condition clears and it closes automatically.
Summary
You create and maintain your rules from Configure Notifications: pick an alert type, set the severity and thresholds, choose the nodes and channels, and optionally ask for a notice when the alert resolves. Rules can be edited or deleted at any time without affecting other users.
Next, review the available alert types in the Alert catalog.